Have you ever tried to fill out a web form in an eCommerce domain that requires a lot of clicking through and selecting? You will be asked to fill out the date, category, gender, location, rating, job title, country, state, etc… and even after filling them all, you are presented with a captcha that you can never solve.
In this article, we’ll learn the benefits of a voice form built with Speechly. We’ll also show you how to implement voice assistance in your React app using Speechly. This tutorial assumes that the reader has:
What is Speechly?
Speechly is a tool that makes it easier to create voice-enabled user interfaces for apps on any platform. You can use it to build VR environments, mobile applications, and voice search experiences in eCommerce, warehouses, and games. Speechly allows the user to input data fast and naturally.
- Speechly is fast to integrate, reducing development effort and increasing accuracy.
- If someone uses voice to fill out the form, you can safely skip the stress of Captchas.
- It has full support for web standards and works on any web form.
- Supports multiple languages.
- It supports the most common data types out of the box, such as email, dates, phone numbers, product codes, etc.
- Voice assistance improves accessibility to your app or website.
Speechly allows us to work with React Voice Form Components. This is a new UI library with multi-modal browser widgets that can be controlled with speech, tap, pointer, and keyboard. It allows users to quickly build applications with voice-enabled UIs that can be 10x more efficient than touch-only solutions, helping to improve user experience, conversion, and retention. We’ll be using this library in our code.
Setting up our development environment
Let’s set up our development with React. We’ll use the instructions from the create-react-app official documentation for setting up our project. Run the following commands:
npx create-react-app speechly-voice-form-app
cd speechly-voice-form-app
Speechly installation and Setup
Now that we have our frontend application set up, let’s install Speechly to be able to add voice assistance to our project and set it up.
npm install @speechly/react-client @speechly/react-ui @speechly/react-voice-forms
In our React application, let’s navigate to our index.js. Copy and paste the following code.
import React from "react";
import ReactDOM from "react-dom";
import App from "./App";
import { SpeechProvider } from "@speechly/react-client";
ReactDOM.render(
  <SpeechProvider appId="speechly-appID" language="en-US">
    <App />
  </SpeechProvider>,
  document.getElementById("root")
);
Here, we import the SpeechProvider from Speechly’s react-client. We wrapped our app with the context provider.
We will need to get the appID to be able to connect to Speechly. Let’s head over to Speechly dashboard. You’ll have to sign up for an account with GitHub or your email. After signing up, create a new app, fill in your application name and language and set the Choose a template to “empty” since we will be creating it from scratch. After that, a configuring screen will open up. You can add a few lines of examples you want Speechly to recognize.
Copy the App ID and language, and paste them into your React project.
Adding Intent and Entities
When configuring Speechly, the first thing we need to do is to define the intent and entities. From Speechly’s documentation:
The intent of an utterance that indicates what the user in general wants. … Intents capture the various functionalities of your voice UI. For example, a shopping application might use different intents for searching products, adding products to the cart, removing products from the cart, and going to the checkout.
and
Entities are “local snippets of information” in an utterance that describe details relevant to the users need. An entity has a name, and a value. An utterance can contain several entities. An entity can take different values, and your configuration should give a variety of examples of these.
We will start by adding Entities.
- Type
nameclick on the option, select Person name then Add. - Type
street_addressclick on the option, select Street address then Add. - Type
email_addressclick on the option, select Email then Add. - Type
phone_numberclick on the option, select Phone then Add. - Type
dobclick on the option, select Date (past) then Add.
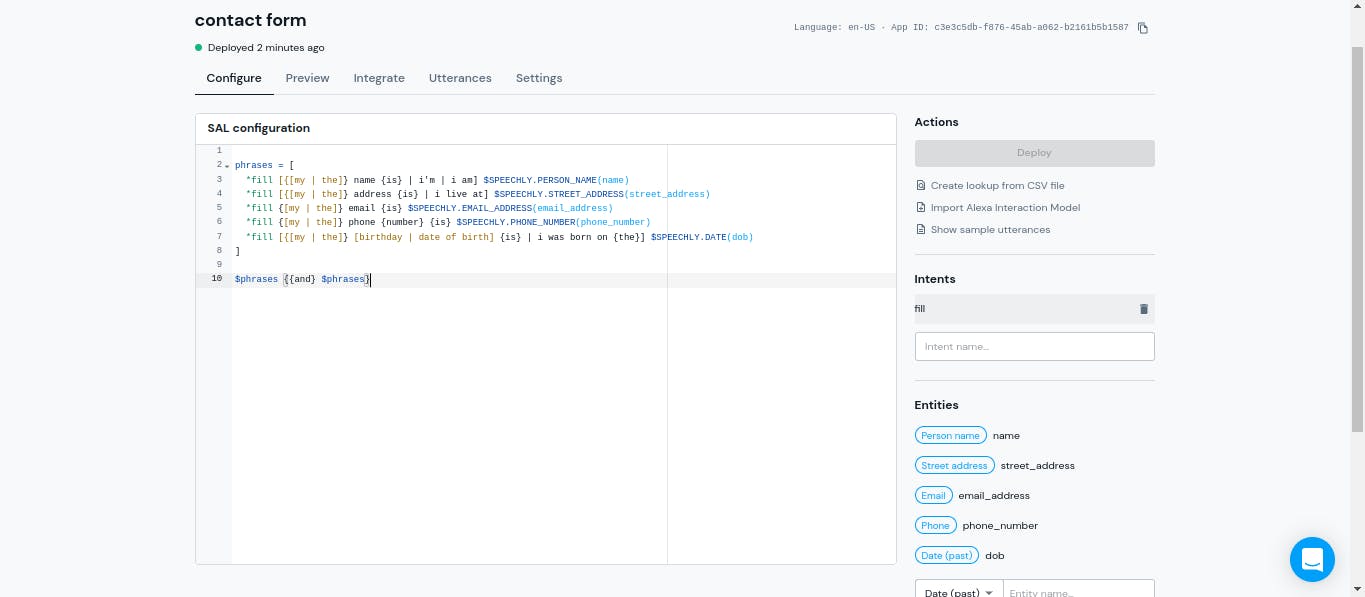
For Speechly to know what kind of values to fill out in our form, it needs a way to adapt to the speech recognition models. We will provide a simple example of how the users might be expressing their intents and entities. Copy and paste this expression into your SAL configuration.
phrases = [
      *fill [{[my | the]} name {is} | i'm | i am] $SPEECHLY.PERSON_NAME(name)
      *fill [{[my | the]} address {is} | i live at] $SPEECHLY.STREET_ADDRESS(street_address)
      *fill {[my | the]} email {is} $SPEECHLY.EMAIL_ADDRESS(email_address)
      *fill {[my | the]} phone {number} {is} $SPEECHLY.PHONE_NUMBER(phone_number)
      *fill [{[my | the]} [birthday | date of birth] {is} | i was born on {the}] $SPEECHLY.DATE(dob)
    ]

    $phrases {{and} $phrases}
Add fill to your intents and then deploy.
 ttps://blog.openreplay.com/static/294dbface..
After deployment, you can head to the preview and test your Entities.
Open Source Session Replay
OpenReplay is an open-source alternative to FullStory and LogRocket. It gives you full observability by replaying everything your users do on your app and showing how your stack behaves for every issue. OpenReplay is self-hosted for full control over your data.
Happy debugging for modern frontend teams - start monitoring your web app for free.
Building out our Form in React
Now that we have our frontend application set up, let’s navigate to our App.js file in the src folder and begin writing some code!. We will be building a simple contact form where users can fill out the form with voice. We can easily build out our form with react-voice forms. Copy and paste the following code. I’ll break it down bit by bit to see what the code does.
// App.js
import React, { useEffect, useState } from "react";
import { useSpeechContext } from "@speechly/react-client";
import {
  PushToTalkButton,
  BigTranscript,
  IntroPopup,
} from "@speechly/react-ui";
import "./App.css";
import { VoiceInput, VoiceDatePicker } from "@speechly/react-voice-forms";
import "@speechly/react-voice-forms/css/theme/mui.css";
function App() {
  const { segment } = useSpeechContext();
  const [data, setData] = useState({
    name: "",
    street_address: "",
    email_address: "",
    phone_number: "",
    dob: "",
  });
  const handleChange = (e, key) => setData({ ...data, [key]: e.target.value });
  useEffect(() => {
    if (segment) {
      if (segment.entities) {
        segment.entities.forEach((entity) => {
          console.log(entity.type, entity.value);
          setData((data) => ({ ...data, [entity.type]: entity.value }));
        });
      }
      if (segment.isFinal) {
        if (segment.entities) {
          segment.entities.forEach((entity) => {
            console.log("✅", entity.type, entity.value);
            setData((data) => ({ ...data, [entity.type]: entity.value }));
          });
        }
      }
    }
  }, [segment]);
  return (
    <div className="App">
      <BigTranscript placement="top" />
      <PushToTalkButton placement="bottom" captureKey=" " powerOn="auto" />
      <IntroPopup />
      <div className="Form">
        <h1>Contact form</h1>
        <div className="Form_group">
          <label>Name</label>
          <VoiceInput
            changeOnEntityType={data.name}
            value={data.name}
            onChange={(e) => handleChange(e, "name")}
          />
        </div>
        <div className="Form_group">
          <label>Street address</label>
          <VoiceInput
            changeOnEntityType={data.street_address}
            value={data.street_address}
            onChange={(e) => handleChange(e, "street_address")}
          />
        </div>
        <div className="Form_group">
          <label>Email</label>
          <VoiceInput
            changeOnEntityType={data.email_address}
            value={data.email_address}
            onChange={(e) => handleChange(e, "email_address")}
          />
        </div>
        <div className="Form_group">
          <label>Phone number</label>
          <VoiceInput
            changeOnEntityType={data.phone_number}
            value={data.phone_number}
            onChange={(e) => handleChange(e, "phone_number")}
          />
        </div>
        <div className="Form_group">
          <label>Date of birth</label>
          <VoiceDatePicker
            changeOnEntityType={data.dob}
            value={data.dob}
            onChange={(e) => handleChange(e, "dob")}
          />
        </div>
      </div>
    </div>
  );
}
export default App;
To process speech, we’ll need several dependencies in our form.
import React, { useEffect, useState } from "react";
import { useSpeechContext } from "@speechly/react-client";
import {
  PushToTalkButton,
  BigTranscript,
  IntroPopup,
} from "@speechly/react-ui";
import "./App.css";
import { VoiceInput, VoiceDatePicker } from "@speechly/react-voice-forms";
import "@speechly/react-voice-forms/css/theme/capsule.css";
Here we import context provider into your application from Speechly React client and ready-made UI components from speechly React-UI
- Push-To-Talk Button is used for starting and stopping listening for speech.
- Big Transcript shows the returned transcript.
- Intro Popup displays a customizable introductory text that briefly explains the voice features microphone permissions are needed for. It also displays recovery instructions for common voice-related problems.
We went ahead to import VoiceInput and VoiceDatePicker components from Speechly React voice forms. The stylesheet we import will help us with our styling.
Handling Speech Input
const { segment } = useSpeechContext();
const [data, setData] = useState({
  name: "",
  street_address: "",
  email_address: "",
  phone_number: "",
  dob: "",
});
const handleChange = (e, key) => setData({ ...data, [key]: e.target.value });
We destructured the useSpeechContext we imported from Speechly React client to get a segment of voice. We import useState from React and initialize our entities to empty strings as our initial state. Finally, handlechange monitors the type of event on our form.
useEffect(() => {
  if (segment) {
    if (segment.entities) {
      segment.entities.forEach((entity) => {
        console.log(entity.type, entity.value);
        setData((data) => ({ ...data, [entity.type]: entity.value }));
      });
    }
    if (segment.isFinal) {
      if (segment.entities) {
        segment.entities.forEach((entity) => {
          console.log("✅", entity.type, entity.value);
          setData((data) => ({ ...data, [entity.type]: entity.value }));
        });
      }
    }
  }
}, [segment]);
We used useEffect to get changes on the segment. Then we define that every time the Speechly API returns the entity we specified, its value will be updated in the specified field.
Speechly API is a real-time streaming platform. Under the hood, when a user is talking, audio is streamed to the backend. As soon as the Speechly API recognizes words, intents, or entities, it will immediately call the callback function back to the frontend to provide information to it.
return (
  <div className="App">
    <BigTranscript placement="top" />
    <PushToTalkButton placement="bottom" captureKey=" " powerOn="auto" />
    <IntroPopup />
    <div className="Form">
      <h1>Contact form</h1>
      <div className="Form_group">
        <label>Name</label>
        <VoiceInput
          changeOnEntityType={data.name}
          value={data.name}
          onChange={(e) => handleChange(e, "name")}
        />
      </div>
      <div className="Form_group">
        <label>Street address</label>
        <VoiceInput
          changeOnEntityType={data.street_address}
          value={data.street_address}
          onChange={(e) => handleChange(e, "street_address")}
        />
      </div>
      <div className="Form_group">
        <label>Email</label>
        <VoiceInput
          changeOnEntityType={data.email_address}
          value={data.email_address}
          onChange={(e) => handleChange(e, "email_address")}
        />
      </div>
      <div className="Form_group">
        <label>Phone number</label>
        <VoiceInput
          changeOnEntityType={data.phone_number}
          value={data.phone_number}
          onChange={(e) => handleChange(e, "phone_number")}
        />
      </div>
      <div className="Form_group">
        <label>Date of birth</label>
        <VoiceDatePicker
          changeOnEntityType={data.dob}
          value={data.dob}
          onChange={(e) => handleChange(e, "dob")}
        />
      </div>
    </div>
  </div>
);
export default App;
We use the voice components we import to build out our form. Then pass on some properties that help make our components work. Here is what our form looks like:
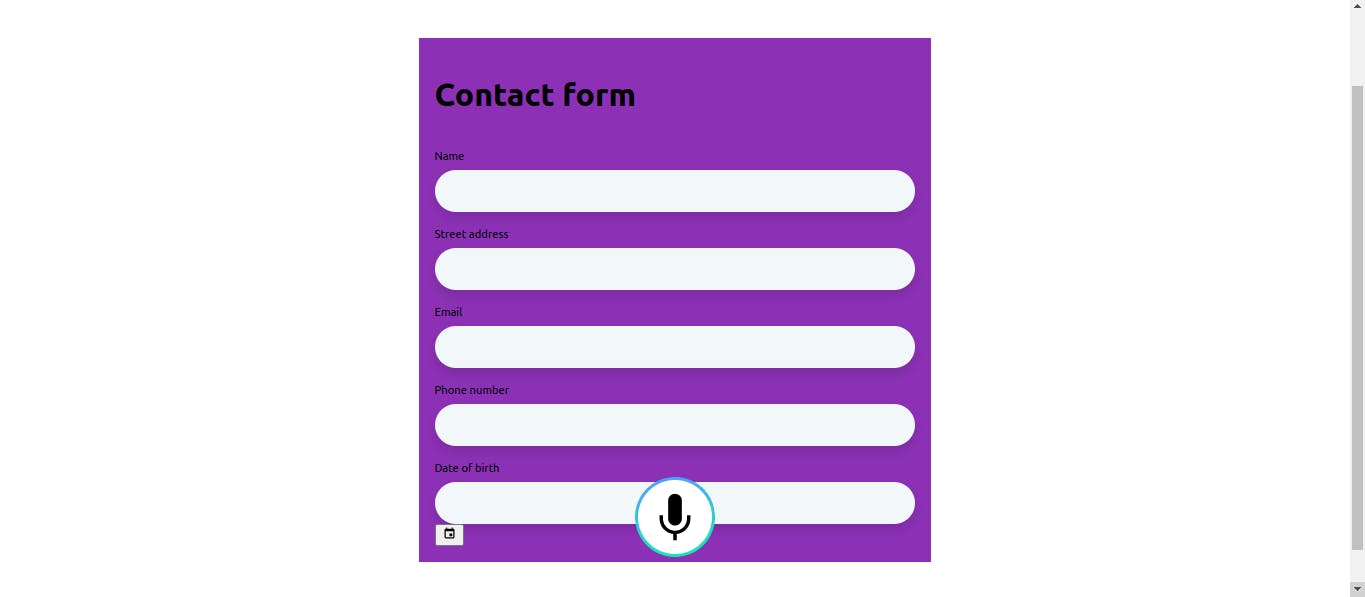
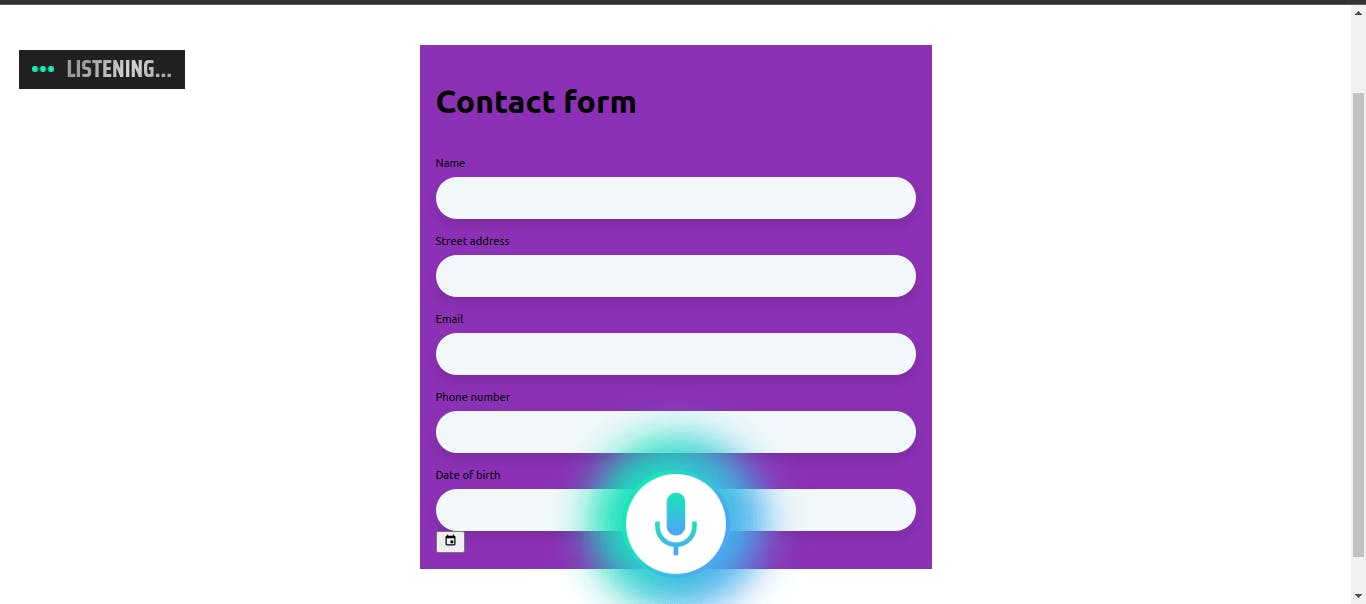
Now that we are done building and setting up our Form with Speechly and React, you can go ahead and test out our app. Open the Browser Console to see speech segment outputs. Click the button, and enter data by talking!
Conclusion
In this article, we learned how to integrate Speechly into our React app. We also know the benefits of integrating voice assistance with the help of Speechly into our app or website. I hope this article gives an insight into how to integrate Speechly into your website and applications.
