


To fetch data from an API, JavaScript comes with libraries like Fetch and Axios. These libraries have an easy syntax and can be easily integrated with popular front-end frameworks like React, Angular, and Vue. In this article, we will focus on making API calls from a Vue application using Axios, a Promise-based HTTP client for the browser and Node.
To get the most out of this article, you’ll need a basic understanding of Vue (check out the official Vue docs) and how the client-server model works.
Example Project
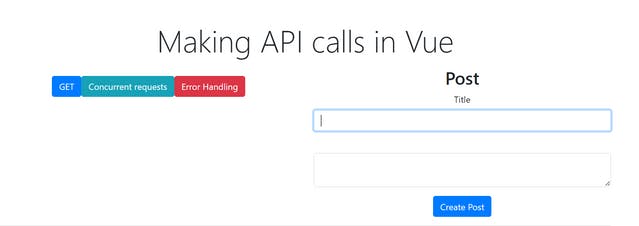
I have built a basic Vue-CLI app to test the requests we will make during this tutorial. You can read more about creating one here. The complete code for this project can be found here.
On clicking the buttons, respective functions are invoked to execute the API calls.
I have created everything in the App.vue component to keep it simple. The bootstrap CDN has been added to the index.html file. We will be making all the API calls in the script block. You can read about the template, script and styles block here
Here’s the template block:
<template>
    <div class="container my-5">
        <div class="text-center">
            <h1 class="display-4 text-center mb-3">Making API calls in Vue</h1>
            <div class="center">
                <div class="row">
                    <div class="col-lg-6">
                        <button v-on:click="onGet" class="btn btn-primary my-3">GET</button>
                        <button v-on:click="onSimultaneous" class="btn btn-info">Concurrent requests</button>
                        <button class="btn btn-danger"> Error Handling </button>
                    </div>
                    <!-- POST -->
                    <div class="col-lg-6">
                        <h2>Post</h2>
                        <form [@submit](http://twitter.com/submit "Twitter profile for @submit").prevent="onPost">
                            <div class="form-group">
                                <label>Title</label>
                                <input type="text" class="form-control" v-model="title" required/>
                            </div>
                            <div class="form-group">
                                <label></label>
                                <textarea class="form-control" v-model="body" required></textarea>
                            </div>
                            <div class="mt-3">
                                <button type="submit" class="btn btn-primary">
                                    Create Post
                                </button>
                                <button type="submit" class="btn btn-secondary">
                                    Add with Custom Headers
                                </button>
                            </div>
                        </form>
                    </div>
                </div>
                <hr />
            </div>
        </div>
        <hr />
        <div>
            {{ res }}
        </div>
    </div>
</template>
Making GET requests
Before making HTTP requests, let’s ensure you have installed Axios in your project. You can install Axios using the node package manager or Yarn.
npm install axios
We will use Axios to make a GET request inside the onGet() method. This function gets invoked once the user clicks the GET button. I have used the JSON placeholder API, which generates JSON data of some random dummy To-do list entries.
The output from the API is stored in the res, which has been declared in the data method. This will be further called in the template block to view the response in the browser.
<script>
import axios from "axios";
export default {
    data() {
        return {
            res: \[\],
        };
    },
    name: "App",
    methods: {
        // The get method called by the function
        onGet() {
            axios
                .get("[https://jsonplaceholder.typicode.com/todos](https://jsonplaceholder.typicode.com/todos)")
                .then((response) => {
                    console.log(response);
                    // using stringify to beautify the output
                    this.res = JSON.stringify(response.data);
                })
                .catch((errors) => {
                    console.log(errors); // Errors
                });
        },
    },
};
</script>
The then() method has been used to handle the response. If there's some error, this promise is rejected, and the next promise is called.
A response object consists of the following information
- data — response provided by the server
- status — HTTP status code from the server
- statusText — HTTP status message from the server
- Headers — meta-data associated with the API request. Read more
- config — config that was provided to Axios during the request
- request — the request that was sent to generate this response.
We have used response. data and the output for the above code would look like this:

To limit the number of objects in the output, we can send a param with a limit set to 5. We can send different parameters according to our requirements. Read more about it here
axios
    .get("[https://jsonplaceholder.typicode.com/todos](https://jsonplaceholder.typicode.com/todos)", {
        params: {
            \_limit: 5,
        },
    })
    .then();
Alternatively, we can change the URL to :
[https://jsonplaceholder.typicode.com/todos?_limit=5](https://jsonplaceholder.typicode.com/todos?_limit=5)
Adding the URL again and again in every request can be tiring. Hence we can use a property to set the base URL in the main.js, the entry point for the code.
Axios.defaults.baseURL = '[https://jsonplaceholder.typicode.com/'](https://jsonplaceholder.typicode.com/%27);
This sets the baseURL, and hence the modified onGet method looks like this:
onGet() {
    axios
        .get("todos/?limit=5")
        .then((response) => {
            console.log(response);
            this.res = JSON.stringify(response.data);
        })
        .catch((errors) => {
            console.log(errors);
        });
}
We get five to-do list entries on the web page.

Concurrent Requests
axios.all is a helper method built in Axios to deal with concurrent requests. Instead of making multiple HTTP requests individually, the axios.all method allows us to make multiple HTTP requests to our endpoints.
On clicking the Concurrent requests button, data from 2 different APIS, i.e., To-do and Posts, should be fetched and displayed on the browser.
axios.all takes an array of requests, in this case: requestOne and requestTwo.
onSimultaneous() {
    // Defining the URLs we want to access
    // POSTS API
    let one = "[https://jsonplaceholder.typicode.com/posts?\_limit=1](https://jsonplaceholder.typicode.com/posts?_limit=1)";
    // TODO LIST API
    let two = "[https://jsonplaceholder.typicode.com/todos?\_limit=1](https://jsonplaceholder.typicode.com/todos?_limit=1)";

// Method we want to perform on those URLS
    const requestOne = axios.get(one);
    const requestTwo = axios.get(two);

// Resolving the two requests
    axios
        .all(\[requestOne, requestTwo\])
        .then(
            axios.spread((...responses) => {
                // Response from posts
                const responseOne = responses\[0\];
                // Response from Todos
                const responseTwo = responses\[1\];
                this.res\[0\] = responseOne.data;
                this.res\[1\] = responseTwo.data;
                console.log(this.res);
            })
        )
        .catch((errors) => {
            // react on errors.
            console.error(errors);
        });
}
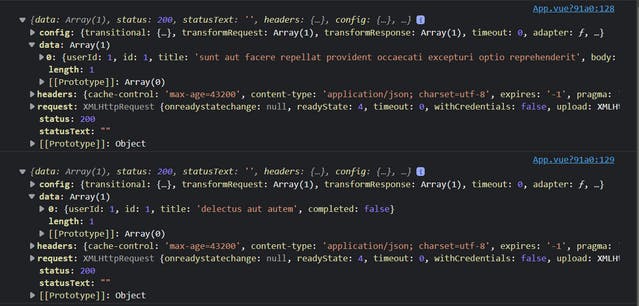
We can check the console to see that responses to both requests have been logged.
Doing POST Requests
I have created a database in Firebase to see the reflected changes made after the POST request. Read more about how to create one here
For making a POST request in Axios, two parameters are required:
- the URL of the service endpoint
- an object that contains the properties you wish to send to the server.
We take the title and body from the user via a form input. On submitting the form, the onPost method is invoked to make a POST request and send the data to the database.
We have also updated the baseURL in the main.js file to the firebase URL
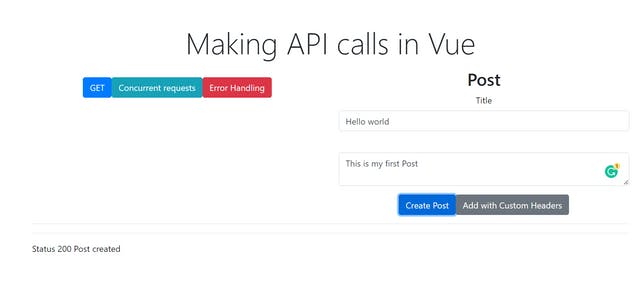
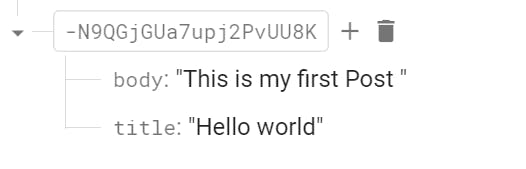
The data is added to the Firebase database and Voila! We just created our first post!
Similarly, we can do the PUT/PATCH, DELETE request using the Axios properties. You can read more about it here and here
Open Source Session Replay
OpenReplay is an open-source, session replay suite that lets you see what users do on your web app, helping you troubleshoot issues faster. OpenReplay is self-hosted for full control over your data.
Start enjoying your debugging experience — start using OpenReplay for free.
Sending Custom Headers
To send an access token, we can use different headers; the Authorization header is one of them. For detailed information, checkout
We will discuss two methods to send headers with the request in Axios.
1. Passing Object argument
We can create an object and pass the necessary headers to it. This object can be sent with the request, and the POST request code gets modified to:
axios.post(
    "posts.json",
    {
        title: this.title,
        body: this.body,
    },
    {
        headers: {
            "Content-Type": "application/json",
            Authorization: "KrvLC6sUgU",
        },
    }
);
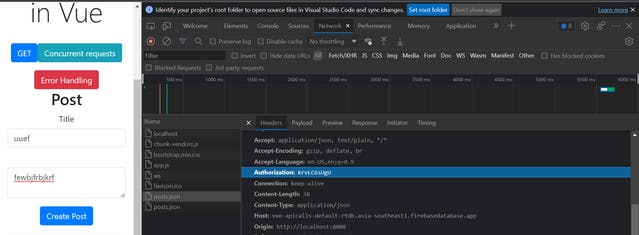
On checking the Network Tab, we can see the headers we passed in the request.
It can be tedious to set the headers again and again, so we can set the default header in the main.js file. This code sets authorization headers for all the post requests:
Axios.defaults.headers.post\['Authorization'\] = \`Bearer ${localStorage.getItem('access\_token')}\`;
2. Axios Instance
We can also set request headers for API calls by creating a specific instance of Axios. We can reuse this configuration each time we make a request using this particular instance.
Let’s create a services folder with a file axiosInstance.js in it and write the following code :
const { default: Axios } = require("axios");

const axiosinstance = Axios.create({
    baseURL: "[https://jsonplaceholder.typicode.com](https://jsonplaceholder.typicode.com)",
});

axiosinstance.defaults.headers.common\["Authorization"\] = "Dummy Token";

export default axiosinstance;
We can use this axiosInstance directly in any of the requests by importing.
import axiosinstance from '../services/axiosinstance' ;
and using it in the request
axiosinstance.get("todos").then((response) => {
    console.log(response);
});
The respective headers are sent; thus, this method can be used to send specific headers to some requests.
You can also read about Axios interceptors, which are used for handling Authorization.
While making these requests, there are chances that the app may crash due to many reasons from the server side like data unavailability, wrong request format sent to the server, etc. It is imperative to monitor these errors as it helps in debugging the code.
Error Handling
To avoid the web application from crashing, we can handle the errors by displaying messages/alerts to make the user aware. Instead of simply console logging the error, we can capture the errors and send a custom message to improve the user experience.
Let’s create a function onError to understand Error Handling. We are using the wrong URL to get an error while fetching the data.
If our error object consists of a response field, we can use err. response to check the root cause of the error. Similarly, if our error object has a request field, we can use the err.request.
axios
    .post(url, data)
    .then((res) => {
        //Everything works fine
    })
    .catch((err) => {
        if (err.response) {
            // client received an error response (5xx, 4xx)
        } else if (err.request) {
            // client never received a response, or request never left
        } else {
            // anything else
        }
    });
On clicking the Error Handling button, the onError function is invoked, and an alert is sent to display the errors.
onError() {
    axiosInstance
        .get("todoss", {})
        .then((response) => console.log(response))
        .catch((err) => {
            if (err.response) {
              // Server responded with a status other than 200 range
                console.log(err.response.data);
                if (err.response.status === 404) {
                    alert("Error: Page Not Found");
                }
            } else if (err.request) {
                // Request was made but no response
                console.error(err.request);
            } else {
                console.error(err.message);
            }
        });
}
Using error handling is one of the good practices while writing APIS. You can read more about handling errors in Axios here.
We pretty much covered all the basics of making API calls in a Vue application using Axios in this article. You can deep dive into this by referring to the official docs and try your hands on it!
A TIP FROM THE EDITOR: For more on using Axios, be sure not to miss our How to Make HTTP Requests with Axios and Fetch vs. Axios: Which Is the Best Library for Making HTTP Requests? articles.
