
Building a Mobile App using HTML, CSS, and JavaScript
A back-to-basics way of developing a mobile app


So you have seen the title, and you are wondering how you can pull off building an actual mobile application by just using the knowledge of basic web technologies without the need to learn Android or IOS development? This is made possible by converting your regular web applications to work as a standard mobile application that can be installed on multiple platforms. By doing this, we will achieve a type of application referred to as Progressive Web Apps (PWAs).
In this article, we will learn how to leverage the power of HTML, CSS, and Javascript to build a simple mobile app. We will not be using frameworks like Ionic or React Native. This is because this tutorial focuses on showing how a basic web app can be made to feel and behave like a native mobile application that can be installed and run on mobile devices using the most straightforward method with the least abstraction.
To proceed, let us have a brief introduction to PWAs.
What are Progressive Web Apps?
According to Official MDN Web Docs:
Progressive Web Apps (PWAs) are web apps that use service workers, manifests, and other web-platform features combined with progressive enhancement to give users an experience on par with native apps.
In simple terms, they are basically websites styled like apps that can be run either inside a website browser or installed directly on a mobile device and accessed like a native app.
There are three key components of a PWA;
- Service Worker: The service worker transforms the website into an app by allowing it to download and cache files on a device.
- Web Manifest: This JSON file provides the basic meta-information about the app, such as the app icon, background color, etc.
- Secure HTTPS: HTTPS is mandatory and makes PWAs more secure than regular web apps.
PWAs have pros and cons. Among the former:
- Cheap and Fast Development: PWAs are less expensive, quicker, and easier to create than native apps. Native app development from the ground up necessitates particular technologies for both platforms. HTML, CSS, and JavaScript are all that are required for a PWA.
- Cross-Platform Availability: One of the promising advantages of PWAs is that they can be installed and run on multiple devices across various operating systems.
- Offline Functionality: Having bad or no internet at all won't stop users from using your app as it can cache data for offline viewing using service workers.
- Performance: Compared to native mobile apps, PWAs are much lighter, don't take as much memory space, and have a faster load time.
On the negative side:
- High Battery Usage: Because PWAs are built-in high-level web code, phones have to work harder to read the code; they use more battery than native apps.
- Mobile hardware access: PWAs cannot access various hardware features like the device's Bluetooth, proximity sensors, etc.
- Distribution Since PWAs are not distributed through the app store, you may miss out on users who mainly browse the app store.
You should consider using/building Progressive Web Apps if you meet the following criteria:
- You don't have the budget to build a full-fledged app.
- You need to push to your target audience faster.
- Having cross-platform compatibility is essential to your business.
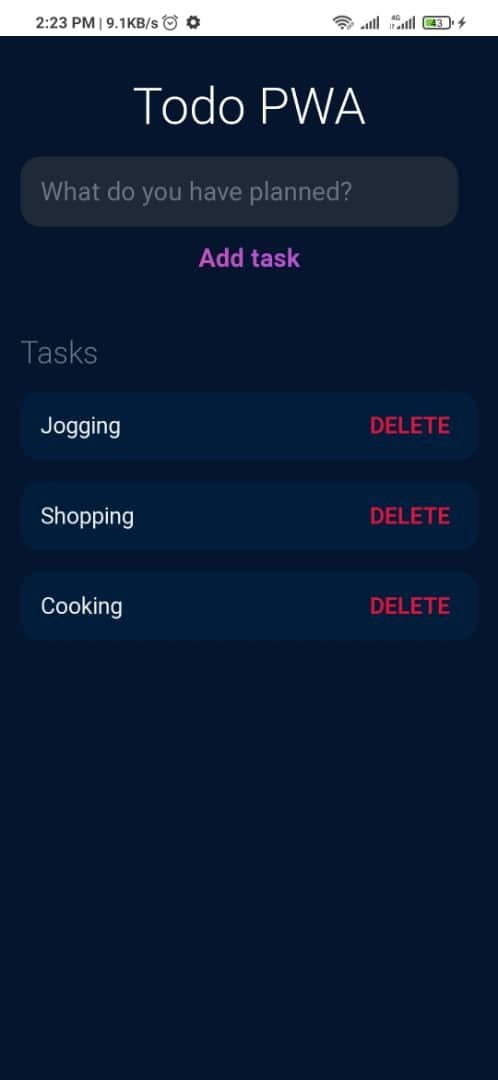
We'll be building a "Todo List" mobile app using HTML, CSS, and Javascript. We will first build out a web app while using IndexedDB for our database, workbox to make it work offline, and web manifest to make it installable across devices. The final result will be as follows:
We start by creating an empty folder called Todo App and then create three files inside called index.html, index.css, index.js, and the assets folder(which will contain our logo).
Structuring Our HTML
Go to the index.html file and enter the following lines of code:
<!DOCTYPE html>
<html lang="en">
<head>
<meta charset="UTF-8">
<meta http-equiv="X-UA-Compatible" content="IE=edge">
<meta name="viewport" content="width=device-width, initial-scale=1.0">
<title>My Todo</title>
<link rel="stylesheet" href="index.css" />
</head>

<body>
 <header>
    <h1>Todo PWA</h1>
    <form id="new-task-form">
     <input type="text" name="new-task-input" id="new-task-input" placeholder="What do you have planned?" />
      <input type="submit" id="new-task-submit" value="Add task" />
    </form>
    </header>
    <main>
        <section class="task-list">
            <h2>Tasks</h2>
            <div id="tasks">
            </div>
        </section>
    </main>

    <script src="index.js"></script>
</body>

</html>
Here, we created our HTML page layout and linked both our index.css and index.js. Now let's move on and add some styling.
Styling our app with CSS
Update the index.css file with the code below:
:root {
    --dark: #05152E;
    --darker: #1F2937;
    --darkest: #001E3C;
    --grey: #6B7280;
    --pink: #EC4899;
    --purple: #8B5CF6;
    --light: #EEE;
}

* {
    margin: 0;
    box-sizing: border-box;
    font-family: "Fira sans", sans-serif;
}

body {
    display: flex;
    flex-direction: column;
    min-height: 100vh;
    color: #FFF;
    background-color: var(--dark);
}

header {
    padding: 2rem 1rem;
    max-width: 800px;
    width: 100%;
    margin: 0 auto;
}

header h1{
    font-size: 2.5rem;
    font-weight: 300;
    color: white;
    margin-bottom: 1rem;
}
h1{
    text-align: center;
}
#new-task-form {
    display: flex;
}

input, button {
    appearance: none;
    border: none;
    outline: none;
    background: none;
}

#new-task-input {
    flex: 1 1 0%;
    background-color: var(--darker);
    padding: 1rem;
    border-radius: 1rem;
    margin-right: 1rem;
    color: var(--light);
    font-size: 1.25rem;
}

#new-task-input::placeholder {
    color: var(--grey);
}

#new-task-submit {
    color: var(--pink);
    font-size: 1.25rem;
    font-weight: 700;
    background-image: linear-gradient(to right, var(--pink), var(--purple));
    -webkit-background-clip: text;
    -webkit-text-fill-color: transparent;
    cursor: pointer;
    transition: 0.4s;
}

#new-task-submit:hover {
    opacity: 0.8;
}

#new-task-submit:active {
    opacity: 0.6;
}

main {
    flex: 1 1 0%;
    max-width: 800px;
    width: 100%;
    margin: 0 auto;
}

.task-list {
    padding: 1rem;
}

.task-list h2 {
    font-size: 1.5rem;
    font-weight: 300;
    color: var(--grey);
    margin-bottom: 1rem;
}

#tasks .task {
    display: flex;
    justify-content: space-between;
    background-color: var(--darkest);
    padding: 1rem;
    border-radius: 1rem;
    margin-bottom: 1rem;
}

.task .content {
    flex: 1 1 0%;
}

.task .content .text {
    color: var(--light);
    font-size: 1.125rem;
    width: 100%;
    display: block;
    transition: 0.4s;
}

.task .content .text:not(:read-only) {
    color: var(--pink);
}

.task .actions {
    display: flex;
    margin: 0 -0.5rem;
}

.task .actions button {
    cursor: pointer;
    margin: 0 0.5rem;
    font-size: 1.125rem;
    font-weight: 700;
    text-transform: uppercase;
    transition: 0.4s;
}

.task .actions button:hover {
    opacity: 0.8;
}

.task .actions button:active {
    opacity: 0.6;
}

.task .actions .edit {
    background-image: linear-gradient(to right, var(--pink), var(--purple));
    -webkit-background-clip: text;
    -webkit-text-fill-color: transparent;
}

.task .actions .delete {
    color: crimson;
}
Open Source Session Replay
OpenReplay is an open-source alternative to FullStory and LogRocket. It gives you full observability by replaying everything your users do on your app and showing how your stack behaves for every issue. OpenReplay is self-hosted for full control over your data.
Happy debugging for modern frontend teams - start monitoring your web app for free.
Setting up Dexie.js to work with IndexedDB
Let's move on to our Javascript file. But first, let's configure our IndexedDB database, a database in the browser that will store all our todos.
Note: This is not local storage but an actual database located in the browser.
To interact with this database, we will need to install Dexie.js, a wrapper around IndexedDB that will help us manage our database with ease. Go to dexie.js documentation and download the script file. Add the following to your head tag in index.html.
<script src="https://unpkg.com/dexie/dist/dexie.js"></script>
Then in the index.js file, we initialize a new database using Dexie.js.
//creating database structure

const db = new Dexie("Todo App");
db.version(1).stores({ todos: "++id, todo" });

const form = document.querySelector("#new-task-form");
const input = document.querySelector("#new-task-input");
const list_el = document.querySelector("#tasks");

//add todo
form.onsubmit = async (event) => {
  event.preventDefault();
  const todo = input.value;
  await db.todos.add({ todo });
  await getTodos();
  form.reset();
};

//display todo
const getTodos = async () => {
  const allTodos = await db.todos.reverse().toArray();
  list_el.innerHTML = allTodos
    .map(
      (todo) => `

    <div class="task">
    <div class="content">
    <input id="edit" class="text" readonly="readonly" type="text" value= ${todo.todo}>
    </div>
    <div class="actions">
    <button class="delete" onclick="deleteTodo(event, ${todo.id})">Delete</button>
    </div>
    </div>
    `
    )
    .join("");
};
window.onload = getTodos;

//delete todo
const deleteTodo = async (event, id) => {
  await db.todos.delete(id);
  await getTodos();
};
In the above code sample, we implemented the basic functions our app should have. We can add, display and delete todos from our database. Now that we have our basic app setup, it's time to focus on what will make our app behave like a typical mobile application. First, we will make our application have offline functionality, which will enable it to work without an internet connection.
Setting up Workbox
Google workbox is the tool that will generate service workers, which will make our app work without an internet connection. First, let's install workbox globally on our machine. Run:
npm install Workboxcli --global
Then to configure our workbox, run:
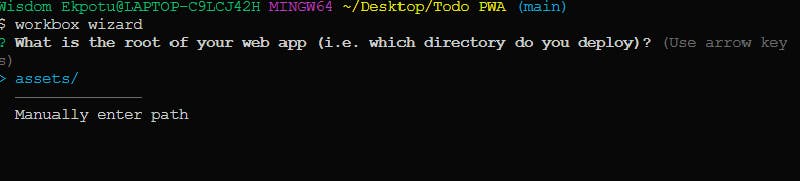
workbox wizard
In the console, you will be asked to register the root path of your application. Select Manually enter path, then use ./ as the root path.
Then, select cache all files. Also, agree to the save for service worker and config, and lastly select no for the last option.
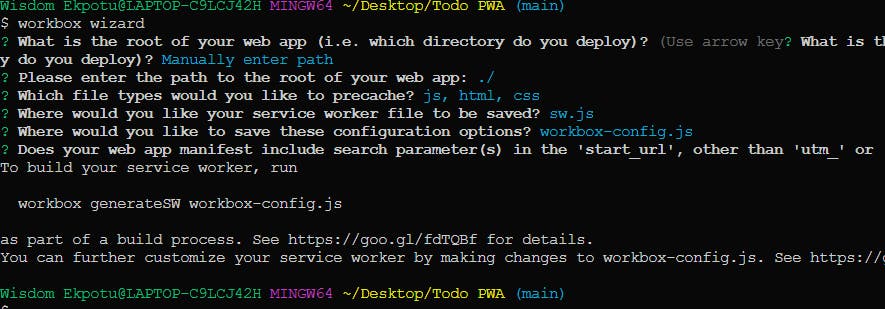
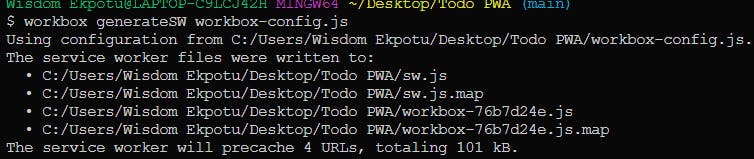
After this, we will see that a file called workbox-config.js has been created. Immediately after this, run this command to generate the service worker.
workbox generateSW workbox-config.js
Now add this code below to the head tag of the HTML file. It will register the service worker when the window is loaded.
<script>
// Check that service workers are supported
if ("serviceWorker" in navigator) {
  // Use the window load event to keep the page load performant

  window.addEventListener("load", () => {
    navigator.serviceWorker.register("./sw.js");
  });
}
</script>
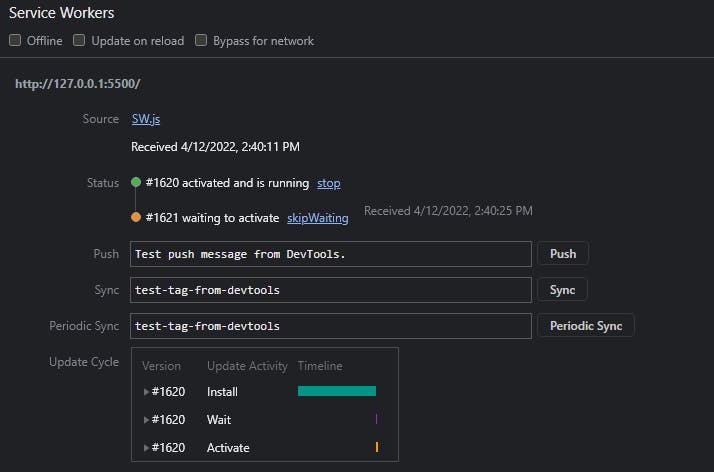
Go to your browser, right-click and click inspect, and then navigate to applications and locate the service worker. You will see that the service worker is already running.
Before we continue, push your code to your GitHub repo and host it. For this article, I am hosting with GitHub pages.
Making App Installable
We have to add a web manifest to our app to achieve this. This is a JSON file that will host necessary details of our app, such as the logo, app name, description, and so on. Go to the root of the app folder and create manifest.json. Then add this code below:
  {
    name: "Todo PWA",
    short_name: "Todo",
    icons: [
      {
        src: "./assets/icon-100.png",
        sizes: "100x100",
        type: "image/png",
      },
      {
        src: "./assets/icon-150.png",
        sizes: "150x150",
        type: "image/png",
      },
      {
        src: "./assets/icon-250.png",
        sizes: "250x250",
        type: "image/png",
      },
      {
        src: "./assets/icon-500.png",
        sizes: "500x500",
        type: "image/png",
      },
    ],
    theme_color: "#FFFFFF",
    background_color: "#FFFFFF",
    start_url: "/PWA-TodoApp/",
    display: "standalone",
    orientation: "portrait",
  };
Then add the link to the manifest file to the head of our index.html file. Now push these changes to your repo.
Testing App on a Mobile Device
Finally, we have completed our Mobile application just by using HTML, CSS, and Javascript. Go ahead and visit your hosted URL and install your app on your mobile device.

Conclusion
Congrats! on making it here. You have learned how to set up mobile apps using your knowledge of basic web technologies and an overview of PWAs. You can go further and expand your knowledge by making use of other frameworks to help you add more capabilities to your application.
If you have any questions, please reach out on Twitter.
Resources
- The code for this can be found here - GitHub repo
- Dexiejs Official Documetation
- Google Workbox
- IndexedDB