Authentication In Next.Js With Clerk

Web and blockchain developer who loves to learn and tinker with new tools and technologies. Also, I love to write technical articles for the web and blockchain space
With the rapid evolution of web development, user authentication has become critical when safeguarding sensitive data and maintaining user trust. Developers often face the challenge of implementing secure and user-friendly authentication systems that provide a seamless experience. Next.js, a popular React framework that provides a rich ecosystem for developing web applications, and Clerk, a developer-friendly authentication platform, make adding authentication to Next.js projects easier, and this article will look at how to combine them to add authentication and security to your code.
Clerk is a cloud-based authentication service that aims to simplify the integration of secure authentication in web applications. It allows developers to concentrate on developing the core features of their application without worrying about the complicated aspect of authentication. With Clerk, you can:
Permit users to log in using their Google, GitHub, or other social network accounts that they already have.
Allow users to log in using a one-time passcode (OTP) given to their phone instead of a password.
From a single dashboard, control user accounts, roles, and permissions.
You can protect your app using built-in Clerk features like session management and password protection.
Setting up the Next project
The template of the Notes Manager application has already been created using Next.js, Typescript, and TailwindCSS. We will solely focus on adding authentication and security to our application using Clerk. Using the command below, we can clone the repository and follow along:
git clone -b starter git@github.com:am-miracle/secured-note-manager.git
cd secured-note-manager
npm install
By running the npm install command, Next.js 13, along with all other dependencies, will be installed. We will run npm run dev in our terminal and visit localhost:3000 to see the page below:
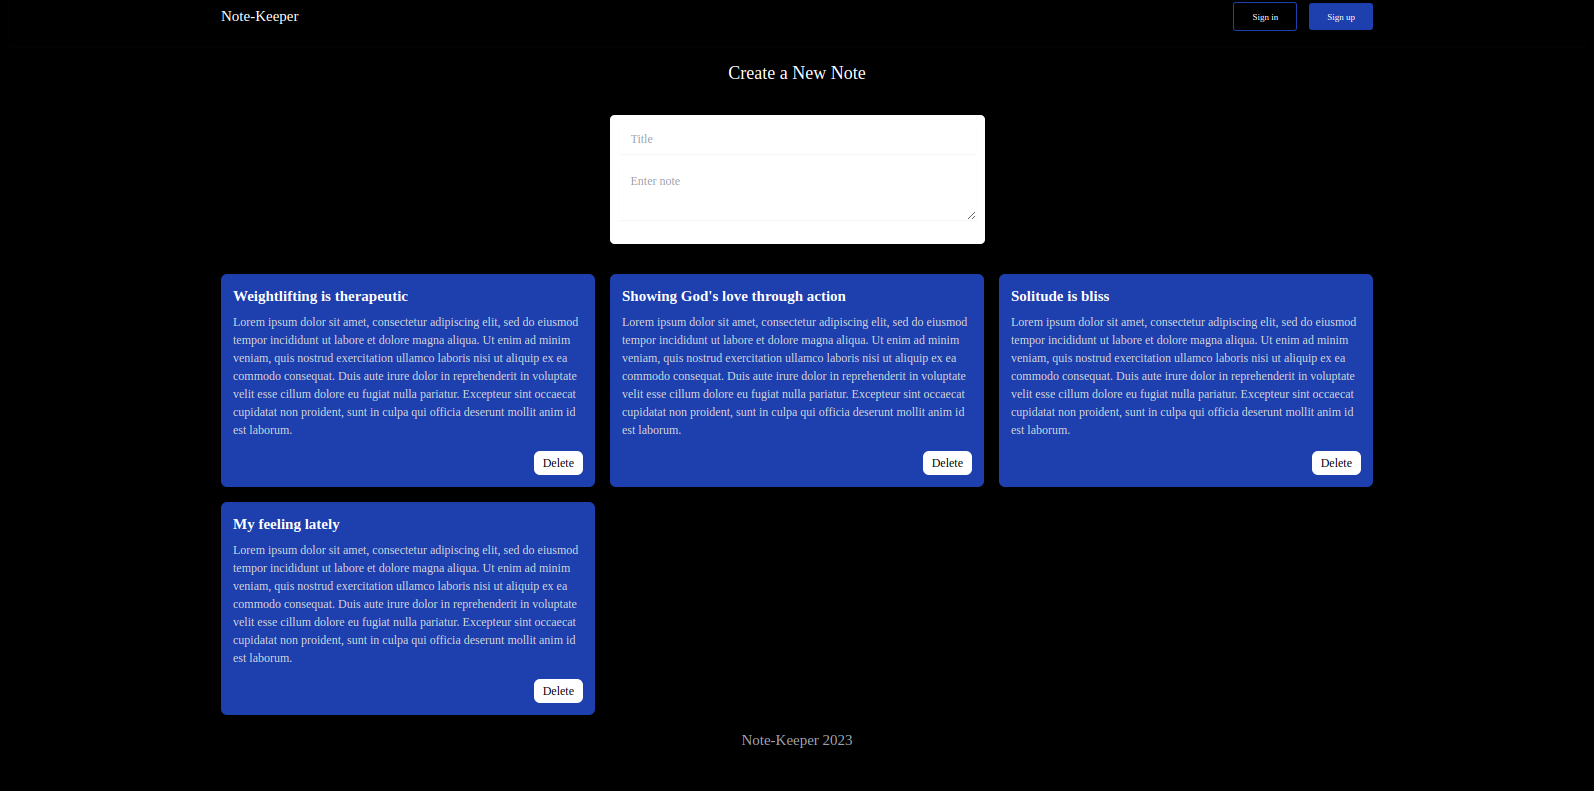
You can browse the app to understand what we will be working on.
Integrating Clerk into Next.js
The first step is to use npm to install Clerk. We can achieve this by running the following command in the directory of your Next.js project:
npm install @clerk/nextjs
After installing Clerk, we must add our API key to our project. We can do this by creating a .env.local file in the root directory of your Next.js project. The .env.local file should contain the following configuration:
NEXT_PUBLIC_CLERK_PUBLISHABLE_KEY=<your clerk public key>
CLERK_SECRET_KEY=<your clerk secret key>
To get our Clerk’s public and secret keys, we must have a Clerk account and create an application. After creating an account, visit the Clerk dashboard, click on Add application, and give the application a name.
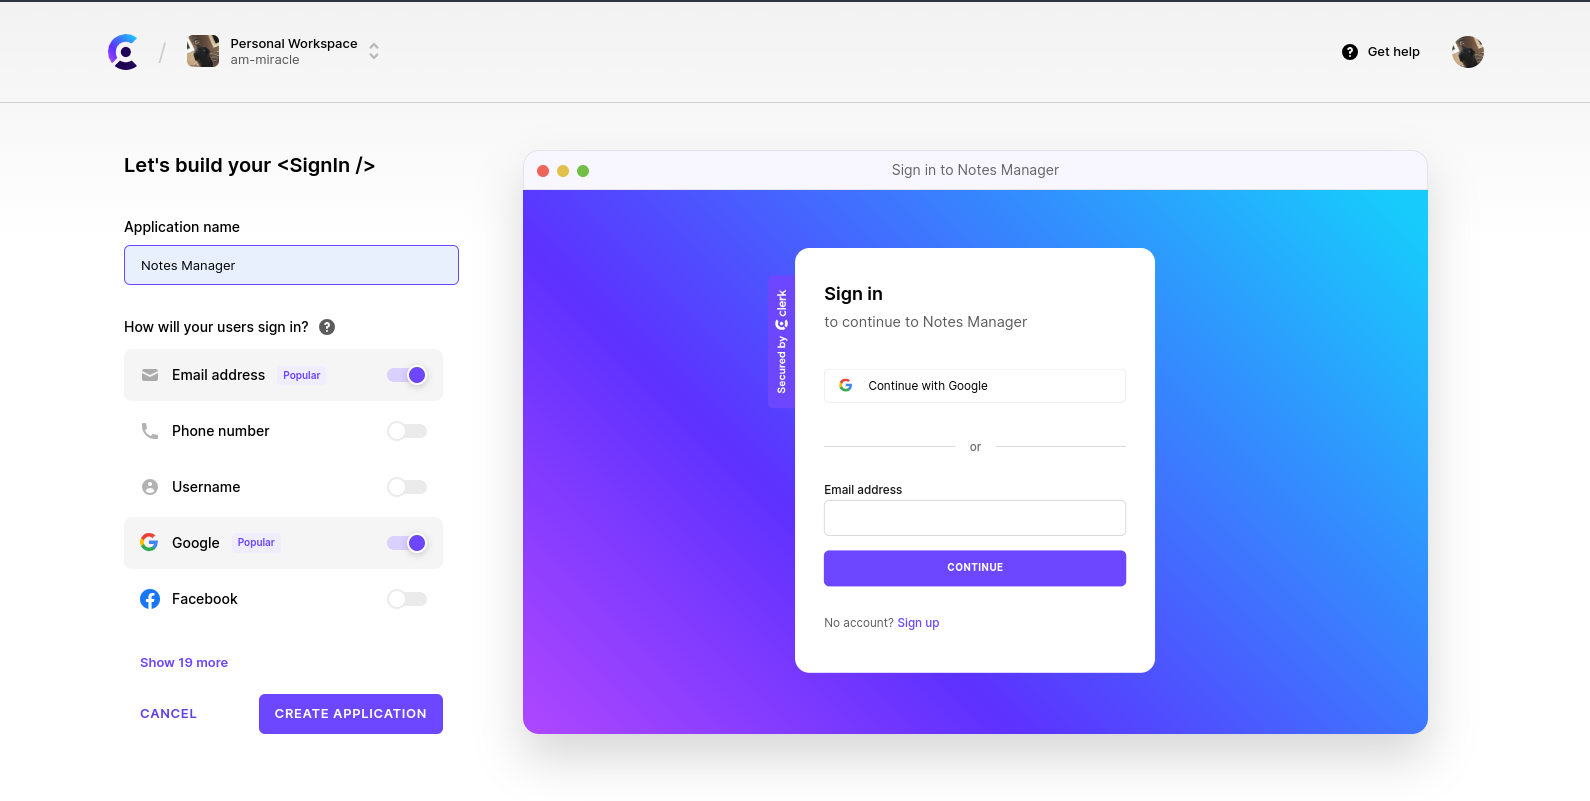
This is what the newly generated application’s dashboard looks like.
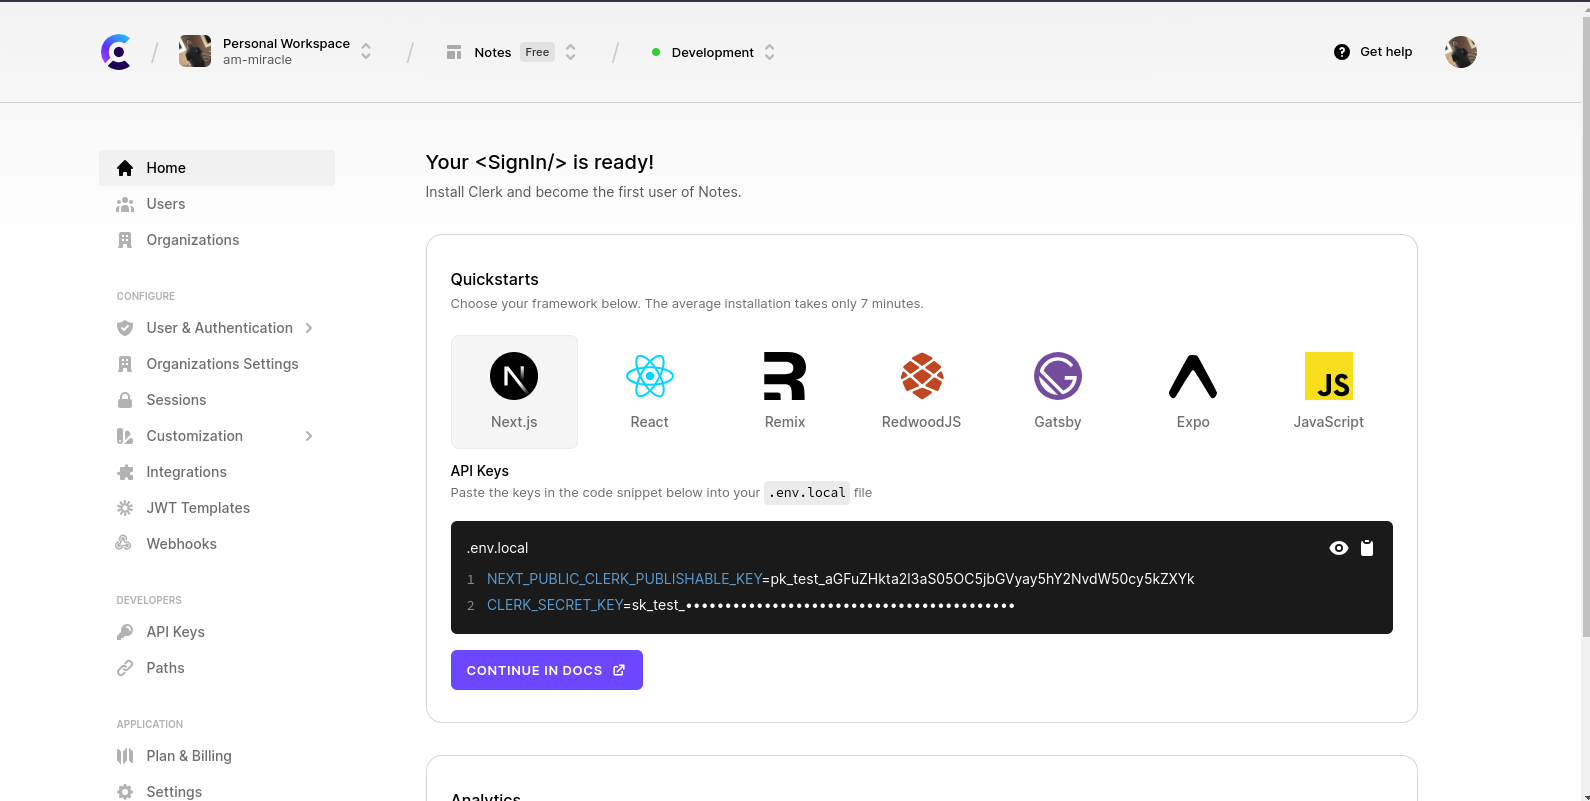
Copy the public and secret keys to the .env.local file. You can check out the Clerk Docs to learn more about the authentication options.
Adding Clerk’s authentication provider
After installing Clerk, we can make it accessible to all your pages by adding its provider to our Next.js application. To accomplish this, import the ClerkProvider component from the clerk package and add it to the layout.tsx file for your application. The <ClerkProvider> component will provide active session and user context to Clerk’s hooks and UI components.
// layout.tsx
/** other imports **/
import { ClerkProvider } from "@clerk/nextjs";
export default function RootLayout({
 children,
}: {
 children: React.ReactNode
}) {
 const year = new Date().getFullYear();
 return (
  <ClerkProvider>
   <html lang="en" className="m-0 p-0 box-border">
    <body className={`${inter.className} w-full h-screen px-4`}>
     <Header />
     {children}
     <footer className="text-xl text-gray-400 text-center">
      Note-Keeper {year}
     </footer>
    </body>
   </html>
  </ClerkProvider>
 );
}
Now that the ClerkProvider component has been added, we can use Clerk’s authentication features.
User Registration, Login, and Sign out
We don’t want an unauthenticated user to create or delete a note but only view notes. To create or delete a note, they should be registered and login. To integrate authentication into our Next app, Clerk provides a set of prebuilt components such as sign-in, sign-up, and other user management features. Now navigate to app/header.tsx and update with the following code below:
"use client";
import {
 SignInButton,
 SignOutButton,
 SignUpButton,
 useClerk,
} from "@clerk/nextjs";
import Image from "next/image";
import Link from "next/link";
import React from "react";
const Header = () => {
 const { user } = useClerk();
 return (
  <nav className="relative flex w-full items-center justify-between bg-inherit py-4 shadow-sm shadow-neutral-700/10">
   <div className="container mx-auto">
    <div className="flex w-full flex-wrap items-center justify-between">
     <div className="flex items-center">
      <Link className="text-white text-xl" href="/">
       Note-Keeper
      </Link>
     </div>
     {user ? (
      <div className="my-1 flex items-center gap-2">
       <div className="h-10 w-10 rounded-full flex items-center justify-center border-blue-800 border">
        <span>
         {`${
          user.firstName && user.lastName
           ? `${user.firstName
             .slice(0, 1)
             .toUpperCase()}${user.lastName
             .slice(0, 1)
             .toUpperCase()}`
           : user.username || ""
         }`}
        </span>
       </div>
       <SignOutButton />
      </div>
     ) : (
      <div className="my-1 flex items-center gap-2">
       <SignInButton />
       <SignUpButton />
      </div>
     )}
    </div>
   </div>
  </nav>
 );
};
export default Header;
Here, we import the component SignInButton, SignOutButton, SignUpButton, and useClerk hook from @clerk/nextjs. The useClerk hook accesses the Clerk object, retrieving objects in ClerkJS SDK and enabling methods for alternative components. Once the user is signed in, we used the user variable we destructured from the useClient hook to get the user’s details such as first name, last name, email, etc.; The SignInButton, SignOutButton, and SignUpButton states are handled automatically by Clerk. With this in place, we successfully added authentication to our application.
Protected Routes and Authorization
Some routes and resources in every application should only be available to an authenticated user. We can easily secure these paths using Clerk and put in place authorization checks. We’ll show you how to build secured routes with Clerk’s APIs so only authorized users can access private pages or carry out particular tasks. This strengthens our application’s security and guards against unauthorized access to restricted resources. To hide the create note form from unauthenticated users. Inside the Notes.tsx component, import the useUser from @clerk/clerk-react. This is another hook provided by Clerk that is used to return the current user state.
const { isSignedIn } = useUser();
Update the return statement with the code below:
{
 isSignedIn ? (
  <>
   <h1 className="text-2xl">Create a New Note</h1>
   <NoteForm onCreate={handleNoteCreate} />
  </>
 ) : (
  <p className="text-2xl text-white">
   Create an account or log in to create a note.
  </p>
 );
}
To hide the delete button from unauthenticated users, navigate to the NoteItem.tsx component, import the useUser hook, and update with the code below:
{
 isSignedIn && (
  <button
   className="bg-white hover:bg-gray-300 text-black py-1 px-3 rounded-lg"
   onClick={handleDelete}
  >
   Delete
  </button>
 );
}
Without users being authenticated, they won’t be able to perform any action on our application. Now let’s decide which pages are public and which require authentication. Let’s say we don’t want our notes to render on the homepage but in a separate route, /notes. We only want the home page to be visible to the public and the remainder to be inaccessible until the user logs into the application. Create a new file in the app directory notes/page.tsx then move the Notes component from the app/pages.tsx folder and add it:
import Notes from "@/components/Notes";
import React from "react";
const NotePage = () => {
 return <Notes />;
};
export default NotePage;
Clerk makes it easy to achieve protected routes by utilizing a middleware that intercepts all requests to protected routes and examines the user’s authorization status. If the user is not authorized, they are forwarded to the login page. The Clerk middleware examines the clerk object whenever a request is made to a protected route to determine whether the user is authorized. The request may go forward if the user has authorization. The request is forwarded to the login page if the user is not authorized. We achieve this by creating a middleware.js file in the src directory and declaring the public and private routes.
import { authMiddleware } from "@clerk/nextjs";
export default authMiddleware({
 publicRoutes: ["/"],
});
export const config = {
 matcher: ["/((?!.*\\..*|_next).*)", "/", "/(api|trpc)(.*)"],
};
Read more about Clerk middleware.
Adding Social Authentication
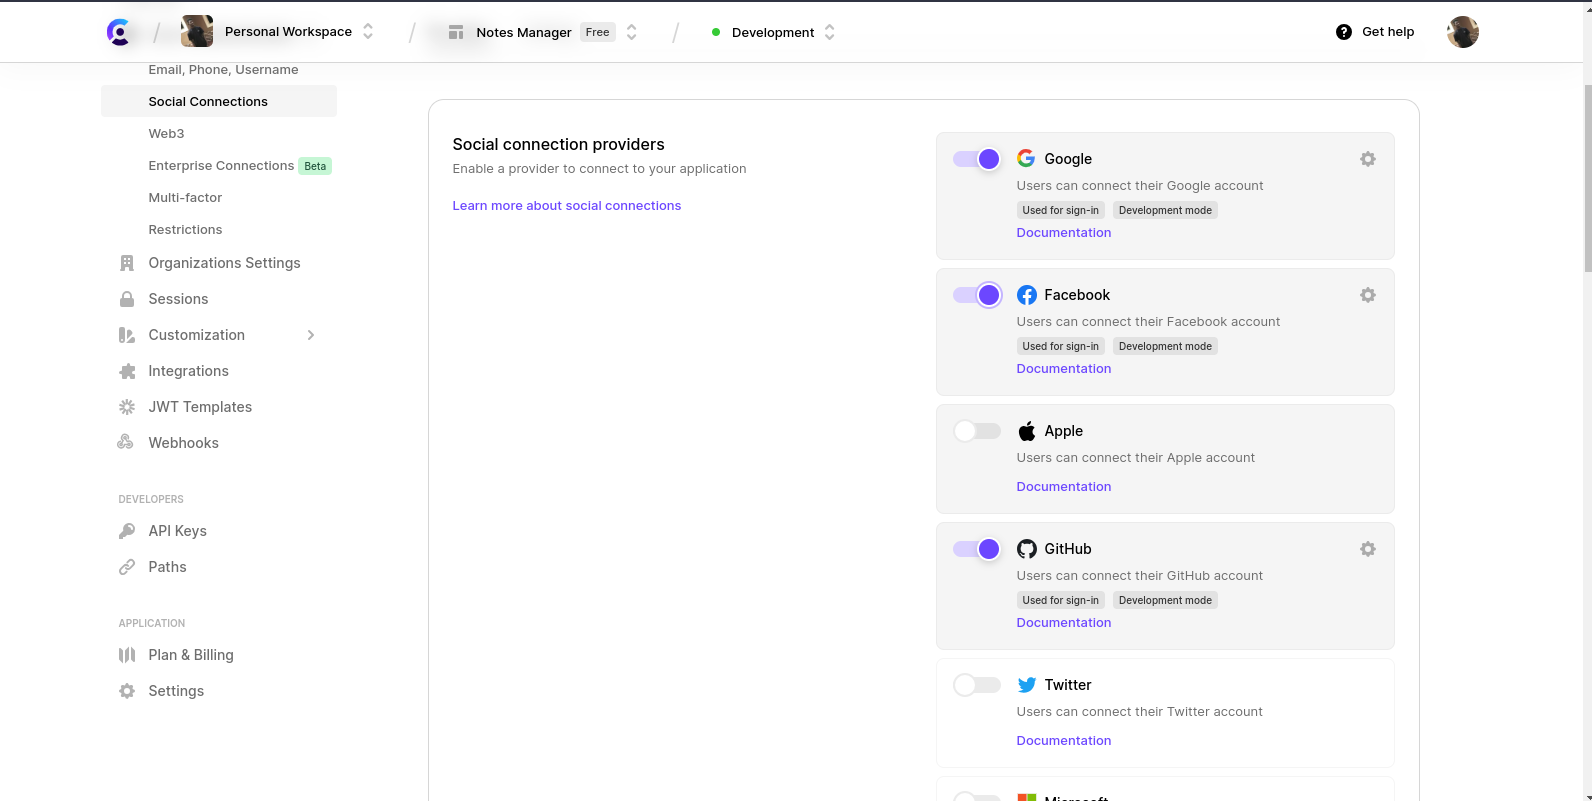
By incorporating social authentication into your application, users can sign in or sign up using their current social media identities, such as Google, Facebook, and GitHub. This gives users an easy and quick way to access your platform without having to create a new account. Let’s review how to set up and authenticate with social authentication services. To add social authentication, navigate to your Clerk dashboard:
Go to the dashboard and click the
User & Authenticationtab.Click the
Social Connectionsbutton and select the provider you want to integrate with.Follow the instructions in the documentation provided by Clerk and the respective social provider to register your application and obtain API keys and secrets. The process for doing this varies depending on the provider you choose.
Click on the
Savebutton. Once you have completed these steps, users will be able to sign in to your application using their social media accounts.
With this, the Clerk SDK will automatically handle the authentication flow and interactions with the social providers. When a user clicks on a certain provider’s social login button (e.g., “Sign in with Google”), your application should call the Clerk SDK to begin the social login sequence. The Clerk SDK will redirect users to the social provider’s login page, where they can enter their credentials or validate the authentication procedure. The social provider will send the user to the specified URL if authentication is successful. Make sure you specify the URL in the signup component<SignUpButton redirectUrl="/notes" />. Your application will retrieve the relevant information from the social provider (e.g., user profile data). Once you’ve obtained the necessary information from the social provider, you can use it to finish the user registration or sign-in process for your application. If it’s their first time logging in, this may entail creating a new user account or signing in an existing user if their account already exists in your system.
Security Considerations
When implementing authentication, security comes first. Data breaches and unauthorized access might result from neglecting it. Here are a few recommendations:
Secure Storage: Passwords that are hashed and salted with powerful algorithms like bcrypt or Argon2.
Use HTTPS to encrypt data exchanged between the client and the server.
Secure Cookies: To guard against attacks, enable the “Secure” and “HttpOnly” options for cookies.
Add an extra layer of protection with two-factor authentication using techniques like SMS or app verification.
Protect Against Vulnerabilities: Use correct validation and encoding to mitigate vulnerabilities like XSS, CSRF, and SQL injection.
Conduct security audits, apply patches, and stay current with best practices by conducting regular audits and updates.
Promote user education regarding proper security practices, including
Conclusion
In this article, we discussed how Clerk simplifies authentication in Next.js, offering secure sign-in, sign-up, and sign-out. We explored how to handle authentication events and protect our routes. We also shared best practices like strong passwords, secure storage, encrypted communication, and enabling two-factor authentication. Clerk is a robust authentication module that offers many advantages to Next.js apps. These advantages consist of:
Ease of use: Clerk integrates well with Next.js applications and is simple to use.
Security: Clerk is an authenticating library that adheres to accepted security standards.
Flexibility: Clerk may be tailored to match the unique requirements of your application since it is adaptable. I recommend checking out Clerk if you’re looking for a user-friendly, reliable, and adaptable authentication library for your Next.js application. You can get further details on Clerk’s website for documentation and resources. Here’s the link to the finished project on Github


