A Practical Guide To Service Workers

Life is becoming more interesting every day...
Currently, I am invested in being a better backend engineer, and also a medical doctor in training.
I have a keen interest in cloud engineering, biotechnology and molecular biology, and a fascination with VR.
In my free time, I enjoy reading, playing strategy games, experiencing music, and exploring philosophy.
Have you ever heard of PWAs? If yes, then you know what’s up. If not, welcome to the world of modern web development. PWAs stand for Progressive Web Apps; a PWA is a web application that functions like a native app. To make this possible, PWAs use Service workers. This beginner-friendly article will describe the basics of service workers, and make a website to see how they work in real-time.
Progressive web apps (PWAs) are a game-changer in the world of web development. They allow developers to create web applications that can function like native apps, providing users with a seamless experience, regardless of the device used. One key technology that enables this is service workers.
If you stick to the end of this article, you will:
Understand what service workers are
Know how Service workers relate to Progressive Web Applications(PWAs)
Understand the role of service workers in web development
Internalize the service worker lifecycle
Develop your service worker to work on a website
Overview of Service Workers
Service workers are background scripts that run independently of the web page, intercepting network requests and caching resources, providing offline capabilities that mean that even when a user is offline, a progressive web app can still load and function correctly, as the service worker will serve cached assets. (Obviously, this depends on whatever caching strategy you apply.) Also, a PWA can load quickly and efficiently, as it doesn’t have to wait for network requests to complete. Do not confuse a service worker with a web worker; a web worker has different functionality.
Another benefit of service workers is that they can send push notifications to users, even when the PWA is not open. Allowing real-time updates and engagement with users, making PWAs an excellent choice for applications that require timely and relevant information.
However, while service workers provide many benefits, they do require careful planning and implementation; service worker implementation requires special functions and methods. Developers need to ensure that service workers do not interfere with the functionality of the PWA and that they handle updates and errors correctly.
With careful implementation, they can help to make PWAs faster, more reliable, and more engaging. As a developer, it’s worth taking the time to understand how service workers work and how they can be used to enhance your web applications. Service workers are supported on all major browsers excluding Internet Explorer and Opera mini.
Mechanism of Service Workers
Normally browsers interface with servers directly. However, when introduced, service workers intermediate between browsers and servers.
Service workers serve as a proxy between the browser and the server to intercept and cache network requests so that in case of a network failure, it has specified files ready to be rendered to the user.
The reason service workers do not interfere with web performance is because they do not interact with the main scripts and the DOM but in the background.
Since service workers are scripts, don’t you think you can have custom pages with service workers? Think about those cute 404 pages you see. How do you think they come about? Yes! Service workers.
Next time you see a 404 page, remember that your browser has that page cached with a service worker, in case the browser goes offline. And if you see the default browser offline page, it lacks a service worker.
Customized 404 page cached with a service worker

Default 404 page with no service worker

Features of Service Workers
When considering using service workers, these are some tradeoffs you should consider:
Service workers cannot directly access the DOM(Document Object Model): Service workers are written in a different context and run differently from the main Javascript file. Hence, service workers cannot access the DOM.
However, service workers use an asynchronous method called the postMessage method to send messages to the main scripts of the website, then the main scripts send these messages sent by service workers to the DOM.
Functions as programmable network proxy: A programmable network proxy is a server-side software written between a server and a client to intercept and modify network requests. Service workers keep an eye on the requests and responses passed between the server and the client to be able to manipulate these responses.
Restart and termination: To ensure that PWAs run as lightweight as possible, service workers can self-terminate when they are not in use, and self-restart when it begins to detect any network request.
Asynchronous operation: Service workers run asynchronously with the use of promises. This enables the website’s script and the service worker to run on different threads.
Makes use of HTTPS: HTTPS stands for Hypertext Transfer Protocol Secure. HTTPS is the secure version of Hypertext Transfer Protocol(HTTP). It is used to secure network requests between a client and a server (secure origin) to prevent eavesdropping and MITM(Man In The Middle) attacks. Guess what’s in the middle of a browser and server in this context? Service workers.
Use Cases
The following are use cases for service workers:
Caching assets: A cache is a storage unit that stores data in a specified format so that future data requests can be served faster. Service workers are used to facilitating this caching. Assets can be images, fonts, or custom pages.
Sending a Push notification: Do you remember those annoying short messages that appear as a pop-up on the top of your desktop browser or mobile home screen? Service workers help with that. They can be customized to send notifications and alerts from websites even offline.
Synchronizing data in background: Now, this is massive. Service workers can be customized so that when the user performs a post request like edit or update in an app with an unstable connection, it can defer that request and only send it to the server when the connection is stable. Of course, it does it in the background through caching and doesn’t affect the offline user experience.
Service Worker Lifecycle
A service worker has to be programmed to go through three stages. The stages initiate if pre-set conditions are detected. The stages are Registration, Activation, and Installation.
Registration: To begin using a service worker, we have to create the service script (Javascript code file containing the service worker code) in the root directory. This gives the service worker access to the entire scope of the website. We do this to ensure it is able to control all the files in the website folder later on. If we keep it in a subfolder, it will be able to access files in that subfolder only. The next step is to register it in the main Javascript of the website. This signals the browser that it is a service worker and should not be part of the main thread but a separate background thread.
Installation: After registering the service worker on a different thread, it fires an Install event which installs the service worker on the browser. The code for installation is on the service worker file.
Activation: After the service worker installs it, it fires an active event to activate it. After this stage, the service worker becomes active and can start listening for events like a fetch call, an HTTP request, and more.
Service Worker Demo - Using SWs with a website
Things are about to get turned up. We will create a dummy website, cache it (using the cache API that JavaScript provides) and observe how service workers give our website an app behavior on our local host.
What we are trying to accomplish in this demo is to ensure our website is still displayed even if our connection fails.
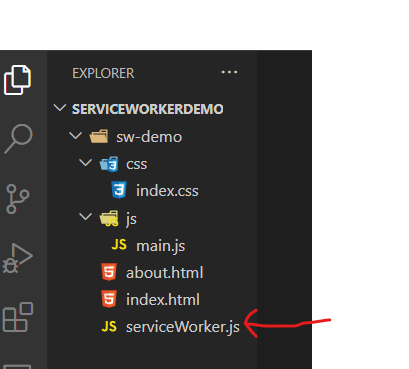
Step 1 - Create File Structure
Arrange all files and folders in this structure. We need coherence in this demo.
Let your service worker be in the root directory:
Step 2 - Make website files
Copy and paste code into these files so we can have our website running. Below find every HTML file we’ll use.
index.html
<!doctype html>
<html lang="en">
  <head>
    <meta charset="UTF-8" />
    <meta http-equiv="X-UA-Compatible" content="IE=edge" />
    <meta name="viewport" content="width=device-width, initial-scale=1.0" />
    <title>Main page</title>
    <link rel="stylesheet" href="./css/index.css" />
  </head>
  <body>
    <header>
      <h1>Intro to Service Workers</h1>
    </header>
    <nav>
      <ul>
        <li class="current"><a href="index.html">Home</a></li>
        <li><a href="about.html">About</a></li>
      </ul>
    </nav>
    <main>
      <h2>Home</h2>
      <p>
        Lorem, ipsum dolor sit amet consectetur adipisicing elit. Aut illo esse
        excepturi? Beatae earum distinctio a facere id sapiente, saepe animi
        magnam debitis, nam voluptate natus quibusdam deserunt neque voluptatum.
        Lorem ipsum dolor sit amet consectetur adipisicing elit. Repudiandae
        labore vitae ex facere ullam voluptate tempora? Unde suscipit repellat
        magnam placeat quam, soluta laudantium, itaque eum, voluptatum odit
        cupiditate nihil?
      </p>
    </main>
    <script src="./js/main.js"></script>
  </body>
</html>
about.html
<!doctype html>
<html lang="en">
  <head>
    <meta charset="UTF-8" />
    <meta http-equiv="X-UA-Compatible" content="IE=edge" />
    <meta name="viewport" content="width=device-width, initial-scale=1.0" />
    <title>About page</title>
    <link rel="stylesheet" href="./css/index.css" />
  </head>

  <body>
    <header>
      <h1>About Service Workers</h1>
    </header>
    <nav>
      <ul>
        <li><a href="index.html">Home</a></li>
        <li class="current"><a href="about.html">About</a></li>
      </ul>
    </nav>
    <main>
      <h2>About</h2>
      <p>
        Lorem, ipsum dolor sit amet consectetur adipisicing elit. Aut illo esse
        excepturi? Beatae earum distinctio a facere id sapiente, saepe animi
        magnam debitis, nam voluptate natus quibusdam deserunt neque voluptatum.
        Lorem ipsum dolor sit amet consectetur adipisicing elit. Ea odit
        assumenda dolore voluptatem totam quam. Nesciunt alias doloremque ut
        expedita nobis nostrum rem. Quae fugit magnam quia similique recusandae
        natus.
      </p>
    </main>
    <script src="./js/main.js"></script>
  </body>
</html>
index.css
body {
  background: #e1eedd;
  font-family: Arial, Helvetica, sans-serif;
  line-height: 1.5;
  margin: 0;
  color: #183a1d;
}

header {
  background: #183a1d;
  color: #e1eedd;
  text-align: center;
  padding: 0.5rem;
}

main {
  padding: 2rem;
}

nav {
  background: #183a1d;
  padding: 0.2rem 2rem;
}

nav ul {
  list-style: none;
  padding: 0;
  display: flex;
}

nav a {
  padding: 10px;
  color: #fff;
  text-decoration: none;
}

nav .current > a {
  color: #f0a04b;
}
Visualizing Work Flow
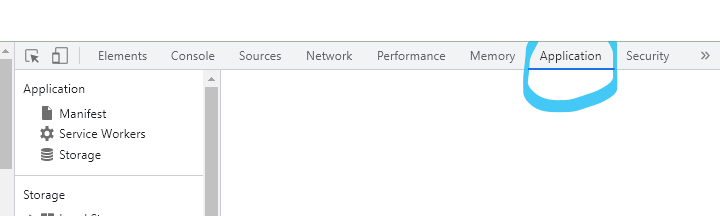
We will use the developer console to view the service workers working in the background. To do this:
Open up your Chrome Developer Tools by using Option + ⌘ + J (on macOS),or Shift + CTRL + J (on Windows/Linux).
Click on the Applications tab.
Clear cache to ensure the website has no saved assets beforehand.
You can see your service workers in the service worker tab. Click on Cache to clear and Click on Service workers to view
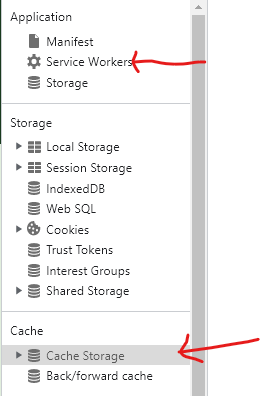
- Click the console tab to see that console has no scripts. Good? Now we are set to go.

Register Service Worker
Go into ./js/main.js and register service worker.
// Check for browser support
if (navigator.serviceWorker) {
  // After browser loads
  window.addEventListener("load", () => {
    navigator.serviceWorker
      .register("/serviceWorkerDemo/sw-demo/serviceWorker.js") // Register
      .then((reg) => console.log("service worker registered"))
      .catch((err) => console.log(`Here is the error: ${err}`));
  });
}
navigatoris an object that contains information about the browser, andnavigator.serviceWorkerchecks if the browser has service worker support.If the browser has service worker support, it then registers the service worker.
Note: Service worker file path must be an absolute file path to avoid errors.
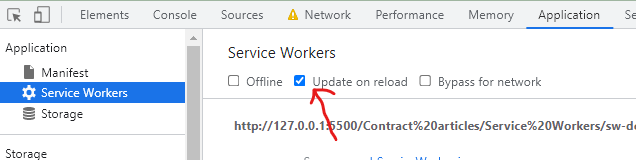
Click on the service worker tab to see registered service worker. Make sure the object on reload is checked.
Install Service Worker
Go into serviceWorker.js file to install service worker.
// add event listener
self.addEventListener("install", (e) => {
  console.log("Service Worker Installed");
});
Check Service worker tab to see its status working
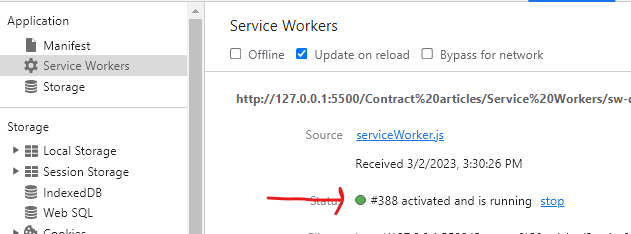
Note: We will revisit this install event later in this tutorial, we just want to make sure everything is working
Activate Service Worker
Activate service worker in the serviceWorker.js file
self.addEventListener("activate", (e) => {
  console.log("Service Worker Activated");
});
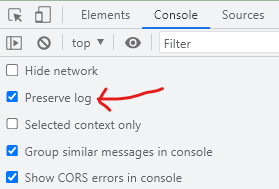
The activate and install logs appear and disappear very quickly but you can them appear by clicking Preserve log in console
Caching website
The primary function of a service worker is to retrieve and display cached resources and assets. We can choose to cache the individual files or cache the website as a whole.
Service workers use the cache storage API to cache assets
This is why PWAs don’t turn blank after going offline, because they easily retrieve assets from the cache after connectivity loss.
List files
Create a cached version and an array of all the pages we want to cache and add it to the top of your code.
const cachedName = "version2";
const cachedAssets = [
  "index.html",
  "about.html",
  "./js/main.js",
  "./css/index.css",
];
Cache files
Revisit the install method, and edit it to install the files.
self.addEventListener("install", (e) => {
  console.log("Service Worker Installed");
  // Cache files
  e.waitUntil(
    caches
      .open(cachedName)
      .then((cache) => {
        console.log("caching files");
        cache.addAll(cachedAssets);
      })
      .then(() => {
        self.skipWaiting();
      }),
  );
});
e.waitUntil()tells the browser that a promise is yet to be resolved, and it should not terminate it until its work is done.cachesprovides thecacheStorageobject to store intended assets in the worker context.After
openmethod creates a slot forcachedName, promises are then made to run and cache assets.waitUntil()is stopped by.skipWaiting()
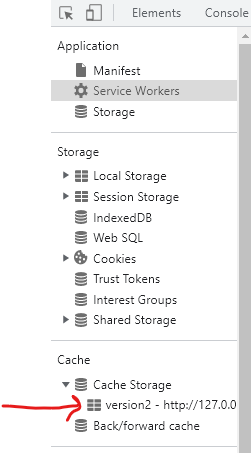
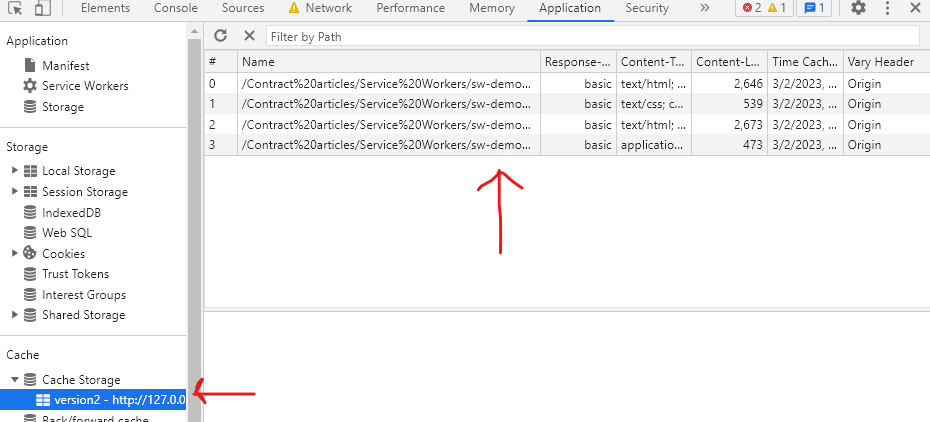
Go to the application tab and click on cached storage, There’s an entry there. If you check the parameters of the entry, you can see the file’s name, size, and time. This means it is ready for offline viewing.
Keep Cache light
To keep the browser lightweight, we have to delete caches we are no longer using. To do this, update the activate event to look like this
self.addEventListener("activate", (e) => {
  console.log("Service Worker Activated");
  //Step - Keep Cache light
  e.waitUntil(
    caches.keys().then((cacheNames) => {
      return Promise.all(
        cacheNames.map((cache) => {
          if (cache !== cachedName) {
            console.log("Cached Service worker is being cleared");
            return caches.delete(cache);
          }
        }),
      );
    }),
  );
});
The new piece code tells the browser to wait until it goes through all caches
caches.keys().then()Then resolve all promises
return Promise.all()Check if there’s any other cache that is not the one in use
if (cache !== cachedName){}Delete everyother cache and return the cache in use
return caches.delete(cache);
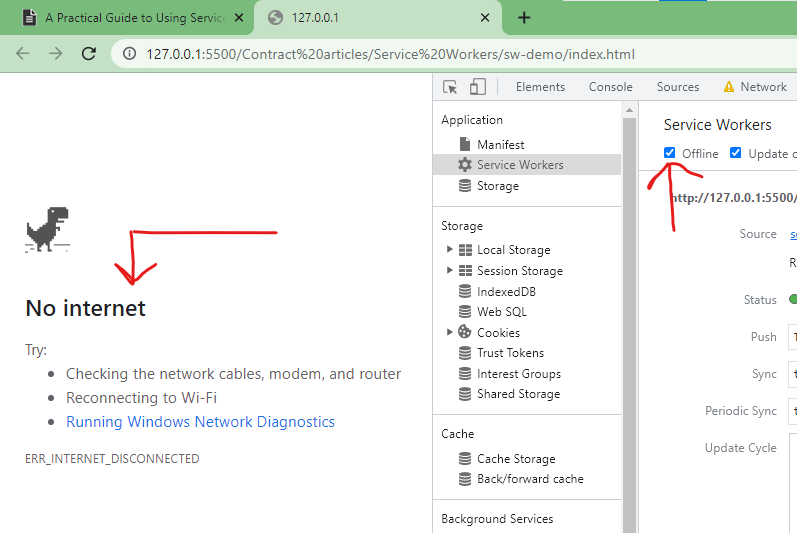
Simulate offline experience
Click on the service worker tab, and click offline. Notice that the chrome custom offline page pops up
Persisting Cache
Now let’s write some code to persist the cached pages even when the website is offline.
self.addEventListener("fetch", (e) => {
  console.log("fetching service worker");
  e.respondWith(
    fetch(e.request).catch(() => {
      caches.match(e.request);
    }),
  );
});
- When the service worker is offline, it will trigger a
fetchevent and the browser will respond with a cached response that matches the request of the service worker.
Ensure the offline checkbox is checked in the service worker tab, reload, and observe that our page still works. Magical right?
Here’s a link to the complete service worker script
Caching the whole website at once
Let’s use a different service worker file, and change the service worker registered in main.js. This approach makes it possible Copy and paste the script from the previous service worker and make these changes:
- Delete the array of pages since we will be caching the full website response.
// DELETE THIS PIECE OF CODE
const cachedAssets = [
  "index.html",
  "about.html",
  "./js/main.js",
  "./css/index.css",
];
- Replace your fetch event
self.addEventListener("fetch", (e) => {
  console.log("fetching service worker");
  e.respondWith(
    fetch(e.request)
      .then((res) => {
        const responseClone = res.clone();
        caches.open(cachedName).then((cache) => {
          cache.put(e.request, responseClone);
        });
        return res;
      })
      .catch((err) => {
        caches.match(e.request).then((res) => res);
      }),
  );
});
In this case, the service worker will clone the whole website
const responseClone = res.clone()Then give the clone as a response when it detects the website is offline
caches.match(e.request).then((res) => res);
The new service worker file should look like this
Conclusion
Service workers are a powerful tool for enhancing the performance, reliability, and engagement of web applications. By intercepting network requests, caching resources, and providing real-time updates, service workers enable developers to create progressive web apps that can function like native apps.
We have explored the features and lifecycle of service workers and even demonstrated how to use service workers on a real website, showing how easy it is to get started with this technology.
As the web continues to evolve, service workers have undoubtedly become even more important for creating high-quality web experiences. By mastering this technology, developers can stay ahead of the curve and deliver innovative web applications that delight users.
So why not give service workers a try and see what you can achieve? With the right approach, you could create a web app that stands out from the crowd and sets a new standard for web development. The possibilities are endless, and the rewards are waiting for those who dare to explore.


