A dive into Wasp; a domain-specific language for building full stack web applications
The present tech world is filled with shiny technologies, and more new technologies and tools are being invented almost daily. This is to say that you have several options of languages and frameworks to choose from if you want to build something as basic as a Todo app. Usually, building something like this, you'd need to use more than one tool (at the very least) to get the app fully functional, plus boilerplates and a lot of configuration would be done from building through to deployment. But what if we have just one language tailored for building full-stack web applications from start to finish - frontend, backend, and database? That would be awesome, right? Of course! Again, what if that language needs fewer boilerplates and zero configs? That would help reduce the timeframe from building to deployment. Such a language now exists, and its name is Wasp.
Introduction to Wasp
Wasp is a domain-specific language (DSL) for building full-stack web applications. This language was built with Haskell, a general-purpose and purely functional programming language. Wasp eliminates the need for configurations because it does all that for you so that you can focus more on building the actual application. It provides an all-in-one solution for building full-stack web applications using your favorite tools - React, Node.js, and Prisma in a single project. How it works is that Wasp lets you describe common features in Wasp DSL, which is a straightforward language and looks a lot like a JSON document, and then write the rest of your code in React, Node.js, and Prisma DB off the bat. In the future, Wasp plans to let developers choose from various frameworks and tools but now only supports React, Node.js, and Prisma DB. Wasp supports Typescript - this is to say you can decide to build all or parts of your web application in Typescript. It also provides built-in authentication with username/password, Google, and GitHub.
Wasp; yet another framework?
These days, new tools are constantly being created off old tools with only a few improvements over the latter. Developers are often skeptical about picking up another framework since a lot of them work similarly. Wasp is not a framework but a programming language specific to the web application development domain. Wasp allows you to describe features your application needs inside main.wasp using the Wasp language then you can build the rest of your project in React and Node.js. This gives you the flexibility of building with tools you are familiar with, while Wasp takes care of the intricacies of connecting the tools for you and offers you a shorter and more straightforward way to get complex things done (it takes care of the complexities for you under the hood). This is to say that you are not learning any new language to build a web app. The Wasp language you define your app features in is a straightforward JSON-like language (you will learn more about this later in this article).
Wasp features and how it caters to developers'
Wasp is new and currently in beta and is rapidly adding support for other tools and rolling out features to cater to the needs of developers. Presently, Wasp offers the following features:
Write React & Node.js code, and use Prisma DB for your project: This is not a feature per se but the fundamentals of Wasp. Wasp, being a domain-specific language lets you build your application with the frameworks you are familiar with. Currently, Wasp supports React and Node.js, but in the future, more frameworks will be added, and Wasp will be more framework agnostic. Your app fundamentals and features, such as authentication, database model, routes, page, operations, etc., are described with the Wasp DSL inside the main.wasp file, and the rest of your application is written in React and Node.js. Wasp utilizes Prisma DB. Therefore you can define your database model (called Entity in Wasp) using the Prisma Schema Language (PSL) inside of Wasp.
Typescript support: What is a scalable JavaScript project without static type checking? There is built-in support for Typescript in your Wasp project. You can write your server-side code and client-side code in Typescript. What if I only want to write my client-side code in Typescript and my server-side code in JavaScript? Wasp caters to that. Wasp allows you to mix and match - write one file in Typescript and another in JavaScript, or write the frontend code in JavaScript and the backend in Typescript or however you feel like mixing it. Write exclusively in JavaScript or Typescript, or just mix them as you want - no configurations needed.
Authentication: Wasp supports authentication with username/password, Google, and GitHub. Other methods will be added soon. Authentication in Wasp takes only five lines of code, is done inside main.wasp, and looks like this:
app myWaspApp{
  title: "My Wasp App",

  auth: { /* full-stack auth out-of-the-box */
    userEntity: User,
    externalAuthEntity: SocialLogin,
    methods: {
      usernameAndPassword: {}, /*users and signup/login with username and password */
      google: {} /* or they can signup/login with their Google account*/
    },
  onAuthFailedRedirectTo: "/login"
  }
}
This is what the Wasp language looks like The auth object takes the userEntity where it expects User to have the fields Username, which is a string, and password, also a string. Wasp hashes the password for you by default before storing it inside the database. onAuthFailedRedirectTo is where users are redirected if authentication fails.
LSP for VS Code: Wasp has its Language Server Protocol for VS Code (other IDEs will be added soon). This means developers who build Wasp projects get syntax highlighting, autocompletion, IntelliSense, and error reporting.
Tailwind CSS support: Wasp provides support for Tailwind CSS so developers can style their applications however they want by tapping into the power of the CSS framework. You could also use plain CSS if that's what you prefer.
Native support for optimistic updates: Optimistic update is when the UI is updated before the server returns a response - if the server returns an "unsuccessful" response, the UI update is reversed. Let's say you are building a web app with a "Like post" feature. A request is sent to the server when a user likes a post, and the UI is updated based on the server's response. What happens when the connection is not as fast? It takes a long time before the server returns a response. Therefore, it takes longer for the post liked to reflect in the UI, and nobody wants that. Optimistic updates help you update the UI in trust that the server will return a successful response (which is usually the case). If the server returns an unsuccessful response (although this is rare), the updated UI is reversed. Applications such as Facebook and YouTube use optimistic updates for the "Like" feature, and StackOverflow and Reddit use it for their Upvote feature. Wasp does the hard work for you; you only need to tell it which query you want to update and how you want to update it.
Wasp CLI: The Wasp command line interface lets you specify wasp commands from your terminal. These commands include wasp build, which prepares your application for deployment by creating static files for the client and a docker image for the backend.
Less boilerplate, Zero configs: Wasp does all the hard stuff for you so that you can focus on building the actual application
Getting our hands dirty: building a CRUD application with Wasp
Let's get down to building a basic CRUD application with Wasp so that you will see how Wasp works. Let's build a TodoApp We need first to install Wasp. Open your terminal and execute the following command:
curl -sSL <https://get.wasp-lang.dev/installer.sh> | sh
If you are running Wasp on Windows, you need to use WSL. This is because Wasp for Windows is not 100% there yet. Wasp requires
node:^18.12.0andnpm:^8.19.2to run. Make sure you have those installed on your machine.
After that you have installed Wasp using the command above, proceed to create and start your Wasp project by running the following commands:
wasp new TodoApp
cd TodoApp
wasp start

//For the first time, it will take a little while
//before your app runs because Wasp needs to install
//all it needs for your project
Now that our app is running, let's look at the important folders.
src/client: This is where you write your client code src/server: This is where your server code lives src/shared: Here resides the code you want to share between the client and the server main.wasp: Define your app features inside this file. .wasp\out: The code in this folder is automatically generated by the Wasp compiler. You don't need to do anything in here.
Head over to main.wasp and let's define our app features - mainly database model and operations. Let's write some Wasp code.
main.wasp
// Wasp generates "app" by itself, but you are allowed to
//change "title", "version," and even "app name" (in this case, TodoApp)

app TodoApp {
  wasp: {
    version: "^0.7.0"
  },

  title: "Todo app",

}

route RootRoute { path: "/", to: MainPage }
page MainPage {
  component: import Main from "@client/MainPage"
}

entity Duty {=psl
    id          Int     @id @default(autoincrement())
    description String
    isDone      Boolean @default(false)

psl=}
We have defined our route and page. The RootRoute takes the path / and routes to MainPage. MainPage is imported from our client directory, and this file is where we will write the React code for our app's client.
Wasp describes database mode as entities - this is a thin layer over the Prisma Schema Language (remember Wasp uses Prisma DB). We have created an entity called Duty and have defined our database model inside it - we want id, which is an Int and automatically increments, description, which is a String, and isDone to mark a Todo duty as done, which is a Boolean whose default is set to false.
Now that our database model is set, we need to run wasp db migrate-dev so that Wasp can verify our database is up to date. You can run wasp db studio at any time to see what you have in your database.
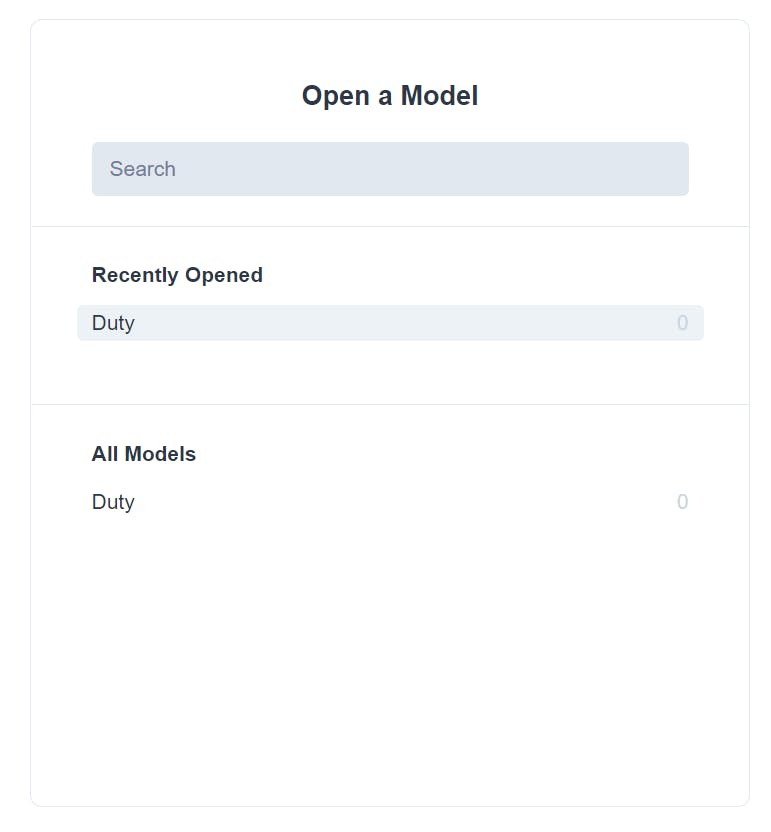
Currently, we have nothing in our database. Running Wasp DB studio shows us that

Session Replay for Developers
Uncover frustrations, understand bugs and fix slowdowns like never before with OpenReplay — an open-source session replay suite for developers. It can be self-hosted in minutes, giving you complete control over your customer data

Happy debugging! Try using OpenReplay today.
Wasp operations
Operations in Wasp are essentially two types: queries, which are for fetching items in your database, and actions for creating and updating your database. For our Todo app, we need to be able to fetch duties, create new duties, and update existing duties (in this case marking a duty as done). To do this, we have to describe it inside main.wasp by using the query keyword for queries and the action keyword for actions.
app TodoApp {
  wasp: {
    version: "^0.7.0"
  },

  title: "Todo app",

}

route RootRoute { path: "/", to: MainPage }
page MainPage {
  component: import Main from "@client/MainPage"
}

entity Duty {=psl
    id          Int     @id @default(autoincrement())
    description String
    isDone      Boolean @default(false)

psl=}

query getDuties { //for fetching duties from our database
  fn: import { getDuties } from "@server/queries.js",
  entities: [Duty]
}

action createDuty { //for creating a duty
  fn: import { createDuty } from "@server/actions.js",
  entities: [Duty]
}

action updateDuty { //for updating a duty
  fn: import { updateDuty } from "@server/actions.js",
  entities: [Duty]
}
fn is the function of the operation you are carrying out. We will create these functions shortly inside src/server. entities was added to inform Wasp that these operations have something to do with Duty; therefore, Duty will automatically refresh to reflect any changes made. Let's create the functions we already imported.
src/server/queries.js
export const getDuties = async (args, context) => {
  return context.entities.Duty.findMany({})
}
Wasp injects in the context object so that we can have access to the entities and here we are fetching Duty. args are the arguments passed to getDuties from the client-side.
src/server/actions.js
//create a new Duty

export const createDuty = async (args, context) => {
  return context.entities.Duty.create({
    data: {
      description: args.description
    }
  })
}

//Update "isDone" when duty is done.
export const updateDuty = async (args, context) => {

  return context.entities.Duty.updateMany({
    where: { id: args.dutyId},
    data: { isDone: args.data.isDone }
  })
}
We are done creating the functions for our todo app operations. Let's furnish up our application by building the UI in React.
src/client/MainPage.jsx
import { useQuery } from '@wasp/queries'
import getDuties from '@wasp/queries/getDuties'
import createDuty from '@wasp/actions/createDuty'
import updateDuty from '@wasp/actions/updateDuty'

const MainPage = () => {
  const { data: duties, isFetching, error } = useQuery(getDuties)

  return (
    <div>
      <DutyForm />

      {duties && <DutyList duties={duties} />}

      {isFetching && 'Fetching...'}
      {error && 'Error: ' + error}

    </div>
  )
}

const Duty = (props) => {
  const handleIsDoneChange = async (event) => {
    try {
      await updateDuty({
        dutyId: props.duty.id,
        data: { isDone: event.target.checked }
      })
    } catch (error) {
      window.alert('Error while updating duty: ' + error.message)
    }
  }
  return (
    <div>
      <input
        type='checkbox' id={props.duty.id}
        checked={props.duty.isDone}
        onChange={handleIsDoneChange}
      />
      {props.duty.description}
    </div>
  )
}

const DutyList = (props) => {
  if (!props.duties?.length) return 'No Duty Scheduled'
  return props.duties.map((duty, idx) => <Duty duty={duty} key={idx} />)
}

const DutyForm = () => {
  const handleSubmit = async (event) => {
    event.preventDefault()
    try {
      const description = event.target.description.value
      event.target.reset()
      await createDuty({ description })
    } catch (err) {
      window.alert('Error: ' + err.message)
    }
  }

  return (
    <form onSubmit={handleSubmit}>
      <input
        name='description'
        type='text'
        defaultValue=''
      />
      <input type='submit' value='Create duty' />
    </form>
  )
}

export default MainPage
Wasp provides useQuery, a thin layer over the React Query library for updating the UI whenever getDuties changes.
createDuty and updateDuty are imported from @wasp/actions, and they handle creating a new duty and updating an existing duty respectively.
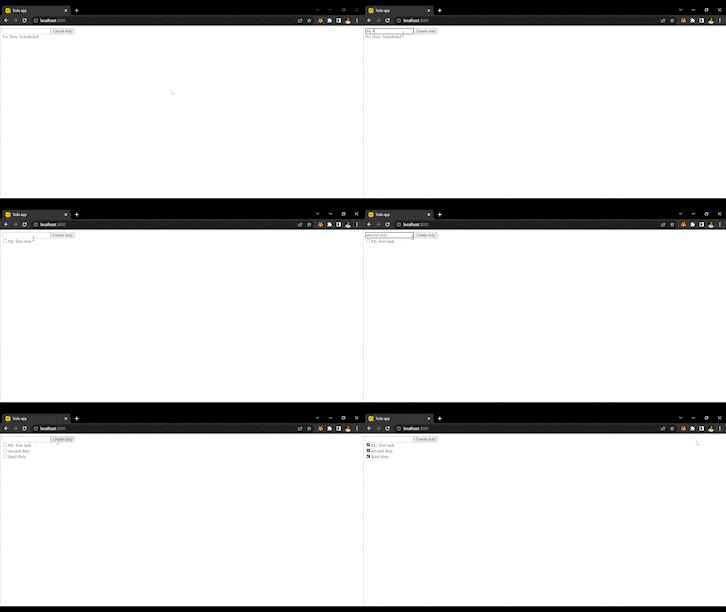
Our Todo app is ready

Deploying Your Wasp Application
Since Wasp is a complete solution for building full-stack web applications, It generates deployable code for you when you run wasp build. The deployable code generated is in the form of static files for your client and a docker image for your backend. The deployable code is found inside .wasp/build/ and can be deployed to any provider such as Railway, Netlify, and Fly.io.
Wasp community: Developer support
Wasp has an active and growing community on discord where you can connect with people building with Wasp, give feedback, contribute to the project, etc. Although a new technology, Wasp is very big on supporting developers building Wasp projects. The team is available to answer your questions and help solve any issues you might encounter while building your project.
Conclusion
Every developer wants to do more with less and Wasp helps you achieve that. You can now build full-stack web applications inside a single project using your favorite tools (React, Node.js, and Prisma DB) and not worry about boilerplate, configuration, etc., because Wasp does the heavy lifting for you.

