


Unit testing is a method of testing that tests individual pieces of code, such as functions or classes, to ensure they are working correctly. When carrying out unit testing in React, individual components of our application are tested in isolation from the rest of the application. Unit testing aims to catch bugs early in the development process before they become a problem in the final product. It gives us a lot of benefits, making it a necessity in the web development process. The following are a few reasons we carry out this process:
Early detection of bugs: Unit tests can help us identify bugs early in the development process before they become more complicated and expensive to fix.
Increased confidence in changes: Unit tests provide an easy way to verify that code changes haven't broken existing functionality.
Can serve as Documentation: Unit tests serve as a form of documentation for the code, providing a clear understanding of how the code is intended to work.
Makes development faster: Unit test provides a way to test small parts of code at a time. This allows developers to focus on one piece at a time and makes it easier to debug our code.
Continuous integration: Unit tests can be included in continuous integration systems, which automatically run tests and provide feedback when code changes are made, helping to ensure that code changes are always tested before they're deployed.
The need for developers to know how to carry out tests on their applications can not be overemphasized, as testing identifies any gaps, mistakes, or missing requirements contrary to the actual requirements, thus confirming the preparedness of the application for public use. With examples, this article aims to teach you how to carry out unit testing on React applications using the React Testing Library.
The React Testing Library
React Testing Library is a library for React that provides an intuitive and efficient API for testing React components. It is built on top of the DOM Testing Library and provides a more user-centered way of testing React components. The library provides a set of utility functions that make it easy to write tests that assert the behavior of React components. RTL functions are designed to work with the actual DOM elements rendered by React rather than the virtual DOM, so tests will closely mimic how a user interacts with the application. You can learn more about the React testing library here.
Building blocks of a unit test in React using the React testing library
A unit test in React using the React testing library looks like this:
import { render, screen } from "@testing-library/react";
import App from "./App";

test("renders learn react link", () => {
  render(<App />);
  const linkElement = screen.getByText(/learn react/i);
  expect(linkElement).toBeInTheDocument();
});
From the example above, the first thing seen is that necessary modules, such as
render,screen, and the component to be tested (App), are imported. The render method returns an object that provides access to the rendered component and several utility methods for querying and interacting with the component.Secondly, our test block contains two parts; the first part is a text where we describe our test, while the second part is a callback function.
In our test block, we render the component to be tested using our render method.
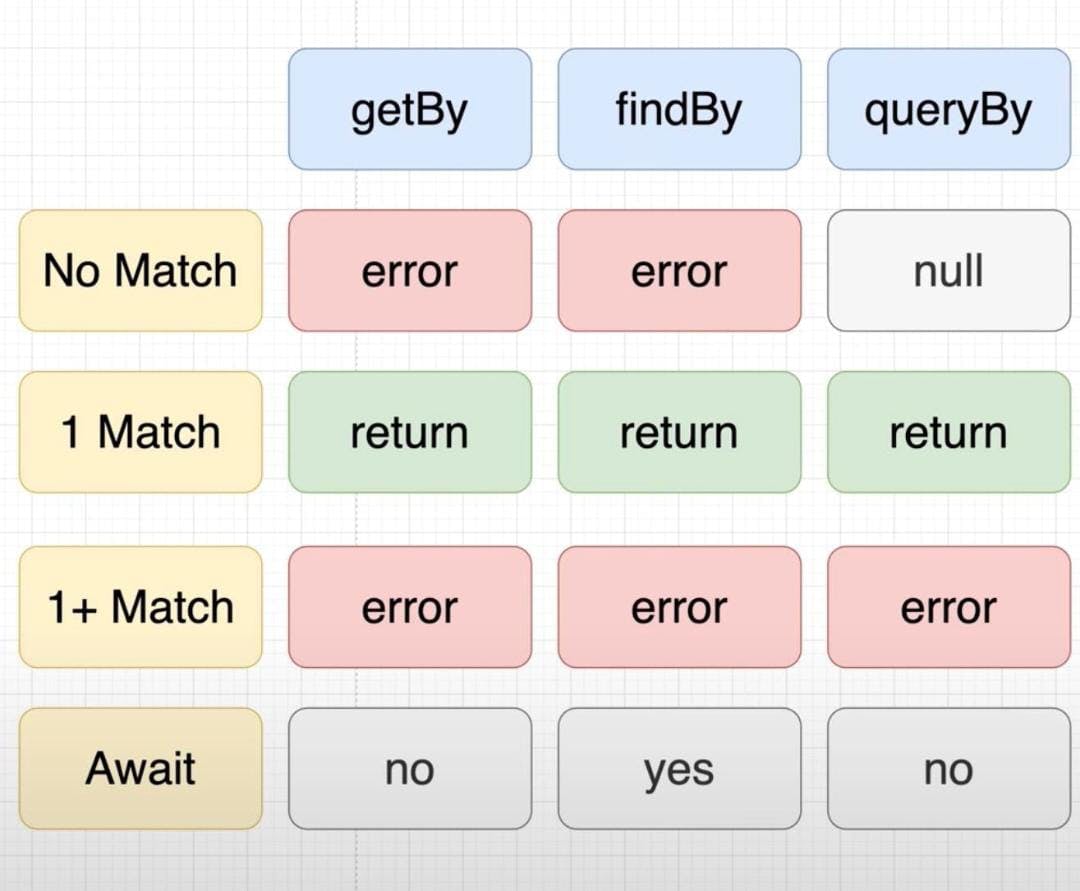
After rendering our component, we need to find the particular element in the component we want to test. There are three main methods for finding elements in a rendered component:
getBy,findBy, andqueryBy.- The
getByfunction is used to get a single element that matches the condition. An error is thrown if no element or more than one element is found with the same attribute. This method is useful when testing if an element is present in the DOM and we expect only one element to match the condition. For example:
- The
const { getByText } = render(<MyComponent />)
const element = getByText('Hello World')
In the example above, getByText will query the DOM for an element with 'Hello World' text content and returns the first matching element. If there is no element with the text 'Hello World' or if there is more than one element with that text, an error will be thrown.
- The
findByfunction is used to get a single element that matches a condition. It returns null if no element is found and throws an error if more than one element is found. This method is useful when you are unsure if the element is present in the DOM or if you expect only one element to match the condition. For example:
const { findByText } = render(<MyComponent />)
const element = await findByText('Hello World')
In this example above, findByText will query the DOM for an element with text content 'Hello World' and returns the first matching element or null if no element is found. If there is more than one element with that text, an error will be thrown.
queryByis used to get all elements that match a condition. It returns null if no elements are found; otherwise, it returns the elements in an array. This method is useful when you expect multiple elements to match the condition. For example:
const { queryByText } = render(<MyComponent />)
const elements = queryByText('Hello World')
In this example, queryByText will query the DOM for all elements with text content 'Hello World' and returns an array of matching elements or null if no elements are found. All these methods accept a condition as an argument, which can be a string (for searching by element text), a component, a role, or any other attribute you need to query. You can also chain several conditions to have a more precise search. Here’s an example;
const { getByRole, getByLabelText } = render(<MyComponent />);
const element = getByRole("button", { name: "Save" }).getByLabelText("Save");
In this example, getByRole will query the DOM for an element with a role of 'button' and with the name prop 'Save'. Then getByLabelText will go through all the elements returned by getByRole; it would then return the same element with the label text 'Save', if no element is found or multiple elements are found, an error will be thrown.
- After finding our element, we can use the
fireEventfunction from the @testing-library/react library to simulate user events (e.g., clicks, input, etc.) on elements in a React component during testing. Here is an example of how to use fireEvent to simulate a click on a button:
import { render, fireEvent } from "@testing-library/react";
import MyComponent from "./MyComponent";

test("clicking the button calls the onClick prop", () => {
  const onClick = jest.fn();
  const { getByText } = render(<MyComponent onClick={onClick} />);
  const button = getByText("Click me");
  fireEvent.click(button);
  expect(onClick).toHaveBeenCalled();
});
In this example, we import the render and fireEvent functions from @testing-library/react. We then import the component that we want to test. In the test function, we create a mock function to use as the onClick prop for the component. We then use the render function to render the component and the getByText function to find the button element with the text "Click me". Using the fireEvent.click function, we simulate a click on the button, and finally, we expect to check that the mock function was called. You can use fireEvent.change to simulate the change event on the input field, fireEvent.submit to simulate the submit event on the form, and many other events
- With our elements found and events fired, we then check if they behave as they ought to or are found where they ought to be found. This check is known as an Assertion, and assertions are used to test if certain conditions are met in the rendered component. These assertions are typically used to check the state of elements, their text or properties, and the component's behavior. RTL provides a set of built-in assertions such as
toHaveBeenCalled,toHaveBeenCalledTimes, andtoHaveBeenCalledWithto assert the behavior of functions like event handlers. For example:
test("simulate and test click event on a button", () => {
  const handleClick = jest.fn();
  const { getByTestId } = render(<MyComponent onClick={handleClick} />);
  fireEvent.click(getByTestId("my-button"));
  expect(handleClick).toHaveBeenCalled();
  expect(handleClick).toHaveBeenCalledTimes(1);
  expect(handleClick).toHaveBeenCalledWith(expect.anything());
});
In this example, we are using jest.fn() to create a mock function that we can assert. We then pass it to the component as a prop and then use fireEvent.click to simulate a click on the button. We then assert that; Using the toHaveBeenCalled() method, we check if the function handleClick was called when the button was clicked. Using toHaveBeenCalledTimes(1), we test if the function handleClick was called only once when our button was clicked. Lastly, using the toHaveBeenCalledWith(), we test that it has been called only once and that it has been called with any arguments.
Note that RTL aims to provide a minimal and flexible set of assertions, and you can use any other assertion library like jest or chai to assert the component's state.
Steps to writing effective unit test with React- Testing Library
Here are steps to follow when writing comprehensive and effective unit tests for our React components using React Testing Library:
Import the required modules: You must import React and the React Testing Library. You'll also need to import the component you want to test.
Write a test: Use Jest's
describeanditmethods to write a test for your component. You'll use the React Testing Library'srendermethod to render the component in the test.Get elements from the component: Use the
getByandqueryBymethods from the returnedrenderobject to retrieve elements from the rendered component. You can use these methods to retrieve elements by their text content, display value, label text, or a combination.Interact with the component: Use the
fireEventmethod to interact with the component. You can usefireEventto simulate user events such as clicking a button, submitting a form, or changing the value of an input.Make assertions: Use Jest's
expectmethod to make assertions about the component's state. For example, you might assert that a form has been successfully submitted or an error message has been displayed.Clean up: Make sure to clean up any spies, mocks, or event listeners you've added to the component before moving on to the next test.
Repeat for each component: Write a separate test for each component you want to test. Repeat the above steps for each test. Now let’s write some tests ourselves.
Writing some unit test
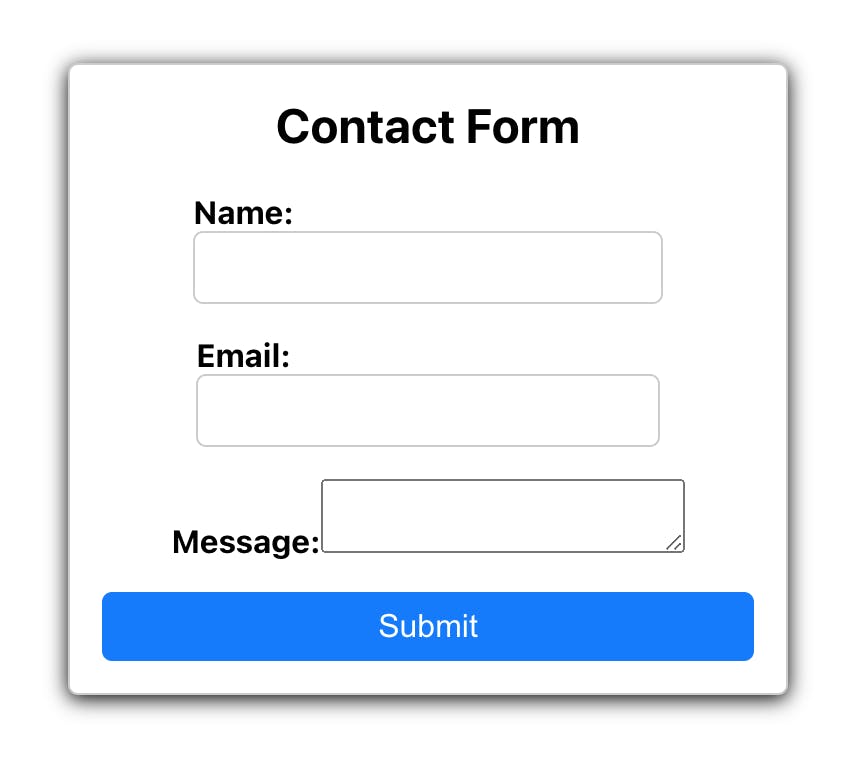
For test purposes, we’ll create a simple contact form with validation for each field.
If our form is submitted with empty input fields, it displays error messages.
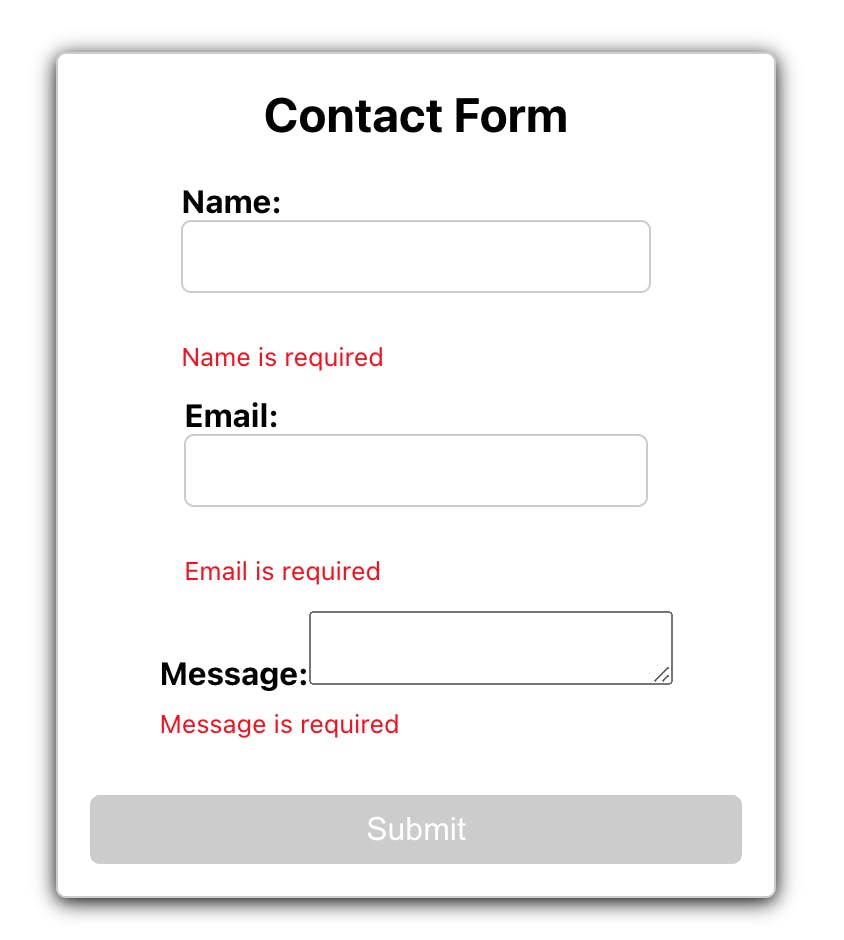
With this done, we’ll write some unit tests for this form;
- Testing that our labels and input fields are rendered correctly:
it("renders the form with correct labels and inputs", () => {
  const { getByLabelText, getByRole } = render(<App />);
  expect(getByLabelText("Name:")).toBeInTheDocument();
  expect(getByLabelText("Email:")).toBeInTheDocument();
  expect(getByLabelText("Message:")).toBeInTheDocument();
  expect(getByRole("textbox", { name: "Name:" })).toBeInTheDocument();
  expect(getByRole("textbox", { name: "Email:" })).toBeInTheDocument();
  expect(getByRole("textbox", { name: "Message:" })).toBeInTheDocument();
});
This test checks that the form has the correct labels and inputs. The render function from react-testing-library is used to render the App component. Then, the getByLabelText and getByRole functions are used to find the elements in the form and assert that they are in the document.
- Testing that errors are displayed for empty fields:
it("displays errors for empty fields", () => {
  const { getByText, getByRole } = render(<App />);
  const submitButton = getByRole("button", { type: "submit" });
  fireEvent.click(submitButton);
  expect(getByText("Name is required")).toBeInTheDocument();
  expect(getByText("Email is required")).toBeInTheDocument();
  expect(getByText("Message is required")).toBeInTheDocument();
});
This test checks that our form displays the correct error messages when the user tries to submit the form with empty fields. Our form is rendered using the render function, and the submit button is found using the getByRole function. The fireEvent function then simulates a click on the submit button. The getByText function finds the error messages and asserts that they are in the document.
- Testing that an error is displayed for invalid emails:
it("display error for invalid email", () => {
  const { getByLabelText, getByText, getByRole } = render(<App />);
  const emailInput = getByRole("textbox", { name: "Email:" });
  fireEvent.change(emailInput, { target: { value: "wdwkfb.com@" } });
  const submitButton = getByRole("button", { type: "submit" });
  fireEvent.click(submitButton);
  expect(getByLabelText("Email:")).toBeInTheDocument();
  expect(getByText("Email is not valid")).toBeInTheDocument();
});
This test checks that the form displays an error message when the user tries to submit the form with an invalid email address. The form is rendered, and the email input is found using the getByRole function. The fireEvent function is used to simulate a change to the email input with an invalid value. The submit button is found and clicked using the same steps as in the previous test. The error message is found using the getByText function and asserted to be in the document.
- Testing that our form is submitted when the right inputs are given:
it("submit the form with correct data when the submit button is clicked", () => {
  const spy = jest.spyOn(console, "log").mockImplementation(() => {});
  const { getByLabelText, getByText } = render(<App />);
  const nameInput = getByLabelText("Name:");
  const emailInput = getByLabelText("Email:");
  const messageInput = getByLabelText("Message:");
  const submitButton = getByText("Submit");
  fireEvent.change(nameInput, { target: { value: "John Doe" } });
  fireEvent.change(emailInput, { target: { value: "johndoe@example.com" } });
  fireEvent.change(messageInput, {
    target: { value: "Hello, I would like to get in touch." },
  });
  fireEvent.click(submitButton);
  expect(console.log).toHaveBeenCalledWith({
    name: "John Doe",
    email: "johndoe@example.com",
    message: "Hello, I would like to get in touch.",
  });
  spy.mockRestore();
});
In this example, we use Jest's spyOn method to create a spy on the console.log method, and then use mockImplementation to replace the method with a mock function. This allows us to verify that the console.log method was called without actually logging any messages to the console. We then use the render method from @testing-library/react to render the App component and use getByText to retrieve the button element from the rendered component. Using the fireEvent.change we provide inputs for our input fields. Next, we use fireEvent.click to simulate clicking the button and then expect to assert that the console.log method was called with the expected message. Finally, we use mockRestore to restore the original console.log method so that the spy won't affect any future tests.
Session Replay for Developers
Uncover frustrations, understand bugs and fix slowdowns like never before with OpenReplay — an open-source session replay suite for developers. It can be self-hosted in minutes, giving you complete control over your customer data

Happy debugging! Try using OpenReplay today.
Running our test
So far, we have seen how to construct our unit test for react applications. To run the test we have written, do the following:
Save your test file in the same directory as the component file, with a name like [component-name].test.js
In your terminal, navigate to the root directory of your project and run the command:
npm run testoryarn testif you are using yarn.The test runner will automatically find and run all test files in your project, displaying the results in the terminal.
If you want to run a specific test file, use the command
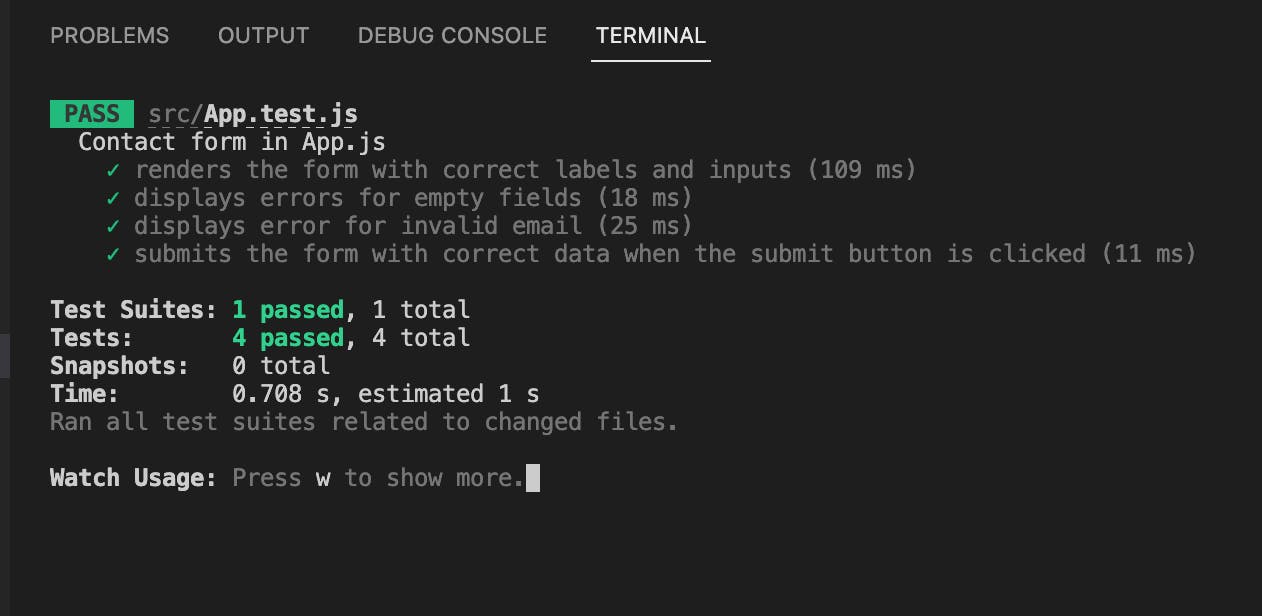
npm run test [test-file-path]oryarn test [test-file-path].The result of our test is shown in the terminal with all the test and their result. Here’s the outcome of our test when they all pass;
Now let’s make one of the tests fail and see what that looks like;
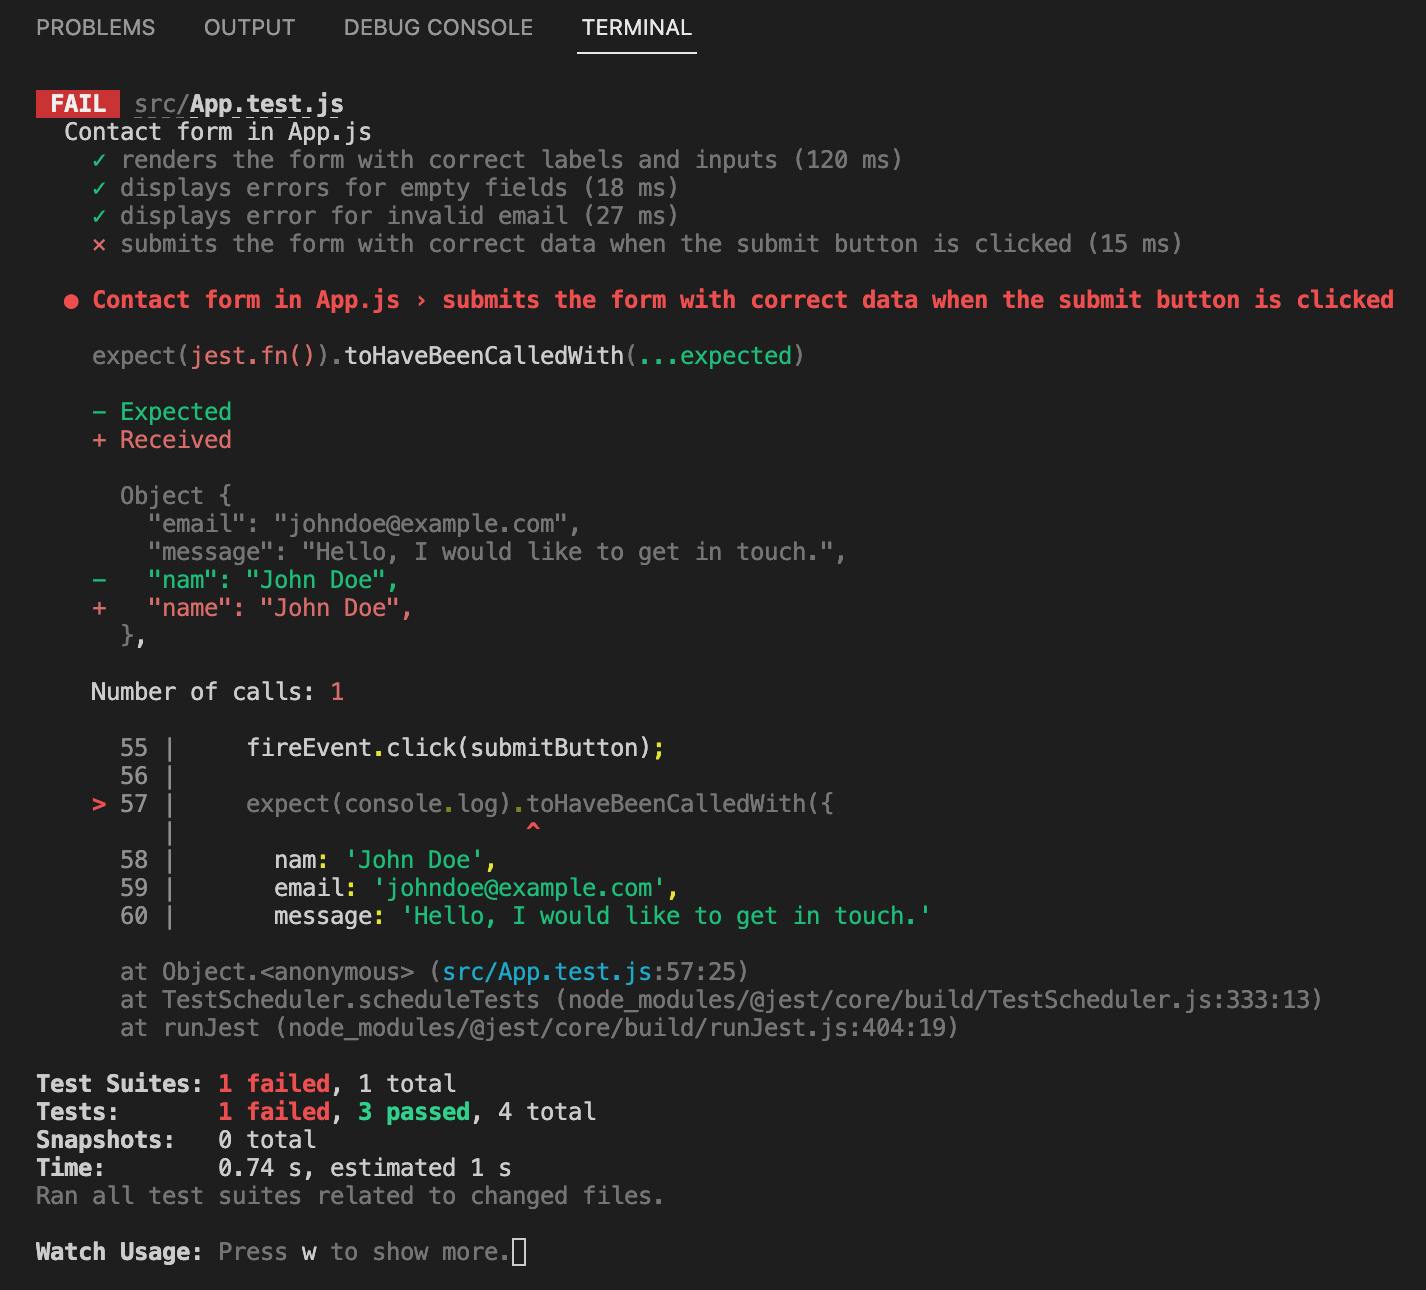
We can see that the React Testing Library shows us precisely what caused the error and where so that we can quickly correct the error.
Tips for writing effective unit test case
- Keep tests small and focused: each test should only test one specific behavior or aspect of the component, and avoid testing multiple behaviors in a single test. This helps improve your test suite's reliability, readability, and maintainability.
Here's an example of a test that does it the wrong way:
import React from "react";
import MyComponent from "./MyComponent";
import { render, fireEvent } from "@testing-library/react";

describe("MyComponent", () => {
  it("tests multiple behaviors", () => {
    const { getByText, getByRole } = render(<MyComponent title="Test title" />);
    expect(getByText("Test title")).toBeInTheDocument();
    fireEvent.click(getByRole("button"));
    expect(getByText("Button clicked")).toBeInTheDocument();
  });
});
This tests both the display of the title and the behavior of a button click, making it harder to understand and debug in case of a failure.
Here's a better way to write the same test:
import React from "react";
import MyComponent from "./MyComponent";
import { render, fireEvent } from "@testing-library/react";

describe("MyComponent", () => {
  it("renders the title", () => {
    const { getByText } = render(<MyComponent title="Test title" />);
    expect(getByText("Test title")).toBeInTheDocument();
  });

  it("handles button click", () => {
    const { getByText, getByRole } = render(<MyComponent title="Test title" />);
    fireEvent.click(getByRole("button"));
    expect(getByText("Button clicked")).toBeInTheDocument();
  });
});
In this example, we're using render from @testing-library/react to render the component and fireEvent.click from Jest to simulate a button click. The getByText and getByRole functions are used to locate elements on the page. These tests are written in separate test blocks, following the recommended practice of keeping tests small and focused, making them easier to understand and maintain over time.
Test for specific outcomes: Unit tests are more effective when we focus on testing specific results or aspects of a component's behavior rather than the overall correctness of its rendering. By testing for specific outcomes, we can ensure that the component functions as intended in specific scenarios. For example, you could test that a component correctly displays certain data when passed certain props or that it triggers an action when a specific button is clicked. These types of tests provide more specific and meaningful information about the component's behavior, making it easier to catch any issues or bugs that may arise.
Test both expected and unexpected behavior: Test that the component behaves correctly when given valid inputs and that it gracefully handles invalid inputs or edge cases. Here's an example; Consider a React component that takes a number value as a prop and returns a message based on the value:
import React from "react";

const ValueMessage = ({ value }) => {
  let message = "";
  if (value > 10) {
    message = "Value is greater than 10";
  } else if (value < 0) {
    message = "Value is negative";
  } else {
    message = "Value is between 0 and 10";
  }
  return <div>{message}</div>;
};

export default ValueMessage;
To write effective unit tests for this component, we should test both expected and unexpected behavior: Testing expected behaviors;
import React from 'react';
import { render } from '@testing-library/react';
import ValueMessage from './ValueMessage';

test('displays "Value is greater than 10" when value is greater than 10', () => {
  const value = 11;
  const { getByText } = render(<ValueMessage value={value} />);
  expect(getByText('Value is greater than 10')).toBeInTheDocument();
});

test('displays "Value is between 0 and 10" when value is between 0 and 10', () => {
  const value = 5;
  const { getByText } = render(<ValueMessage value={value} />);
  expect(getByText('Value is between 0 and 10')).toBeInTheDocument();
});

test('displays "Value is negative" when value is negative', () => {
  const value = -5;
  const { getByText } = render(<ValueMessage value={value} />);
  expect(getByText('Value is negative')).toBeInTheDocument();
});
Now let's test for unexpected behaviors;
import React from 'react';
import { render } from '@testing-library/react';
import ValueMessage from './ValueMessage';

test('displays "Value is between 0 and 10" when value is undefined', () => {
  const { getByText } = render(<ValueMessage value={undefined} />);
  expect(getByText('Value is between 0 and 10')).toBeInTheDocument();
});

test('displays "Value is between 0 and 10" when value is null', () => {
  const { getByText } = render(<ValueMessage value={null} />);
  expect(getByText('Value is between 0 and 10')).toBeInTheDocument();
});

test('displays "Value is between 0 and 10" when value is NaN', () => {
  const { getByText } = render(<ValueMessage value={NaN} />);
  expect(getByText('Value is between 0 and 10')).toBeInTheDocument();
});
In this example, we tested the expected behavior by giving the component valid inputs (numbers greater than 10, between 0 and 10, and negative). We also tested unexpected behavior by giving the component undefined, null, and NaN values for the value prop. These edge cases help ensure the component can gracefully handle invalid inputs and avoid breaking the app.
Use the proper test method: React Testing Library provides different methods for testing components, such as
render,fireEvent, andwait. Choose the appropriate method for the behavior you are testing.Avoid testing implementation details: Components may change internally, but as long as their behavior does not change, our tests should still pass. Avoid testing internal implementation details and focus on testing the component's public API. For example, let's say you have a component called
<Counter />that displays a number on the screen and allows the user to increment or decrement the number. Here's an example of what you might want to test in the<Counter />component:
it("renders the correct number", () => {
  const wrapper = shallow(<Counter value={3} />);
  expect(wrapper.text()).toEqual("3");
});

it("increments the value correctly", () => {
  const wrapper = shallow(<Counter value={3} />);
  wrapper.find("[data-test='increment-button']").simulate("click");
  expect(wrapper.text()).toEqual("4");
});

it("decrements the value correctly", () => {
  const wrapper = shallow(<Counter value={3} />);
  wrapper.find("[data-test='decrement-button']").simulate("click");
  expect(wrapper.text()).toEqual("2");
});
In this example, the tests focus on the behavior of the <Counter /> component. They check that the component renders the correct number, and that the user can increment and decrement it correctly. Even if the execution of the component changes, as long as the behavior remains the same, the tests should still pass. It's important to avoid testing internal implementation details, such as the specific HTML elements used to display a number or button. For example, the component might change from using a <p> element to displaying a number to using a custom <Display> component. As long as the component behaves the same way, the tests should still pass; there's no need to update the tests.
- Use test doubles: Use test doubles such as mocks, spies, and stubs to isolate components from their dependencies, making tests faster and more reliable. Test doubles can isolate components from their dependencies, making tests faster and more reliable. For example, let's say you have a component called
<FetchData />that fetches data from an API and displays it on the screen. When testing the<FetchData />component, you don't want to make a network request to the API, as this would slow down the tests and make them less reliable (e.g., the API could be down, or the response could be different each time). Instead, you can use a test double to simulate the API response. Here's an example of how you might use a mock to test the<FetchData />component:
it("renders data correctly", () => {
  const apiResponse = [
    { id: 1, name: "John" },
    { id: 2, name: "Jane" },
  ];
  const mockFetchData = jest.fn().mockResolvedValue(apiResponse);
  const wrapper = shallow(<FetchData fetchData={mockFetchData} />);

  // Wait for the component to render
  setTimeout(() => {
    expect(wrapper.text()).toContain("John");
    expect(wrapper.text()).toContain("Jane");
  }, 0);
});
In this example, the mockFetchData function simulates the API response. The <FetchData /> component is passed the mockFetchData function as a prop, so it will call it instead of making a real network request. This makes the tests faster and more reliable, as the tests are no longer dependent on the API. You can also use spies and stubs to isolate components from their dependencies. For example, you might use a spy to check that a certain function was called or a stub to replace a real object with a simplified version for testing. Using test doubles is an effective way to isolate components from their dependencies and make tests faster and more reliable. It's a valuable technique to have in your testing toolkit.
Keep test cases up-to-date: Keep test cases updated with the latest changes in the code. This will ensure that test cases are always valid and useful.
Test in isolation: Test components in isolation as much as possible to avoid testing dependencies.
Conclusion
Unit testing helps us confirm that our components are functioning correctly and that changes made to our codebase do not break existing functionality. This can significantly improve the overall quality and reliability of a React application. Additionally, React testing library is easy to use. It integrates well with other popular testing frameworks, making it an excellent choice for any React developer looking to implement unit testing in their projects.
Resources
Unit testing React testing library Repo
