Templates are done either on the server side or the client-side. Most sites nowadays do at least some form of templating. On the server-side, when a request comes into the server, the templating engine pieces together the relevant templates and sends the build page down to the browser. Aside from the server-side, any templating done on the client-side either uses a front-end framework that supports templates or a dedicated templating library.
With React and other modern JavaScript frameworks being so popular many people forget about HTML and vanilla JavaScript. Most of the websites built today still use plain HTML and JavaScript. The HTML5 element provides developers with a robust solution for handling templates in the browser, making the entire web authoring process simple and more maintainable. In this tutorial, we will learn about Template tags in HTML, the benefits and downsides of using them, and their usage.
What is the Tag?
The tag is an HTML5 element that stores HTML code fragments that are not displayed immediately when a page is loaded. This element can be duplicated and inserted into an HTML document. The content of the is hidden from clients as it is stored on the client-side. Templates are not rendered in the browser until you activate them using JavaScript. JavaScript is used to get the content from a template and add it to the web page.
Creating a template is simple. It is done by specifying the element and giving it an appropriate ID.
Benefits and downsides of using the element
On the plus side:
It supports both the event and global attributes in HTML. It helps developers create reusable markups. It supports so many browsers. It can be used in a frontend framework. It improves site speed and performance. As it only runs when activated.
On the minus side:
It relies solely on Javascript. Users with Javascript disabled from their browser won't be able to see content displayed using the template element. Accessibility issues: it affects some older screen-readers.
How to use in JavaScript
In this section, we will use a element to hide our form. We will also show our form and render our form using JavaScript.
First, let's see how to hide the form. In the HTML boilerplate, paste this code within the body element.
<div class="container">
    <button type="button" onclick="showForm()" class="show-form">Show Form</button>

    <!-- html template tag starts here -->
    <template id="todo-input">
    <div class="wrapper">
<form>
  <div>
    <label for="email">Your email</label>
    <input type="email" id="email">
  </div>
  <div>
    <label for="password">Your password</label>
    <input type="password" id="password">
  </div>
  <div>
    <div>
      <input id="remember" type="checkbox" value="" required>
    </div>
    <label for="remember">Remember me</label>
  </div>
  <button type="submit">Submit</button>
</form>
    </div>
    </template>
    <!-- html template tag ends here -->
</div>
Remember, using a makes it very clear that the HTML inside of it needs JavaScript to render content dynamically. Here, we used the tag to hide our content. Now, let's display our form with Javascript. In your script file, add the following:
if("content" in document.createElement("template")) {
    // your code here
} else {
Fetching and rendering user's todo list
    alert("Your browser does not support template element!");
}
Here, we test if the browser supports the HTML template element by checking the presence of the template element's content attributes. Within the if statement block, paste this code.
function showForm() {
   // Selecting the elements
   const template = document.getElementById("todo-input");
   const clone = template.content.cloneNode(true);              document.querySelector('.container').appendChild(clone);   template.innerHTML = "";
}
In the showForm code block, we start by getting a reference to our element using its ID and store this in a variable named template.
Line 4- We are not manipulating anything within the template so we just created a copy of its content template.content.cloneNode(true) and added this to thedocument.querySelector('.container').Line 8- As we know, the template tag has methods for copying the content inside it so it can be repeatedly added to the DOM. Since we don't want our form to be duplicated if the show form is clicked more than once. We set the innerHTML to an empty string.
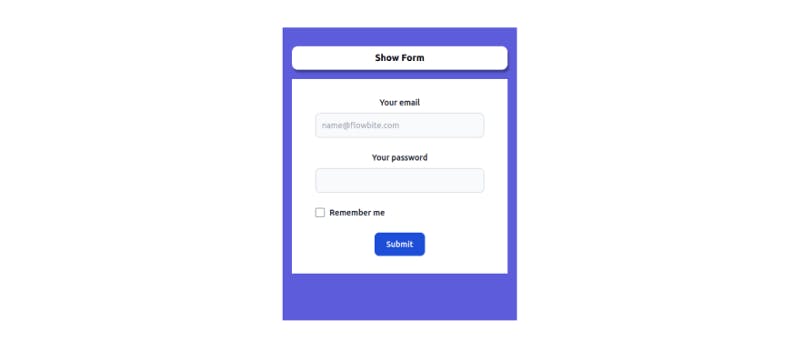
By clicking on the show form, our form will display.

Open Source Session Replay
OpenReplay is an open-source, session replay suite that lets you see what users do on your web app, helping you troubleshoot issues faster. OpenReplay is self-hosted for full control over your data.

Start enjoying your debugging experience - start using OpenReplay for free.
Using with a framework
The tag can be used with a framework like React. However, React handles these elements differently. The idea of this tag is not to render its children, but to handle it like unparsed text. The browser parses it just to make sure it's valid HTML.
To use this tag in React, you will have to set its contents as a string.
function Template({ children, ...attrs }) {
    return (
    <template
    {...attrs}
    dangerouslySetInnerHTML={{ __html: children }}
    />
    );
}
Here, React creates all the child tags as node elements but lets the browser decide what to do with them. Any time we need to use a template, you can use it like this - and note that the inner content should be in quotes because it should be a string.
render() {
    return (
    <Template>
    {'<div>some content</div>'}
    </Template>
    )
}
Conclusion
In this post, we saw how we used to define a reusable fragment of HTML that applications can reuse. It is useful when building less complex applications. Sometimes, it doesn't make sense to build a website with a frontend framework since they are not nearly complex enough. Template tags make adding dynamic content so much easier.

